Weekend Project – Arduino Temperature Meter V2
In the last tutorial, I have shown how to make a Temperature Meter which records highest, current, and lowest temperature with Arduino Mini Pro and a DS18B20 temperature probe.
Material Needed:
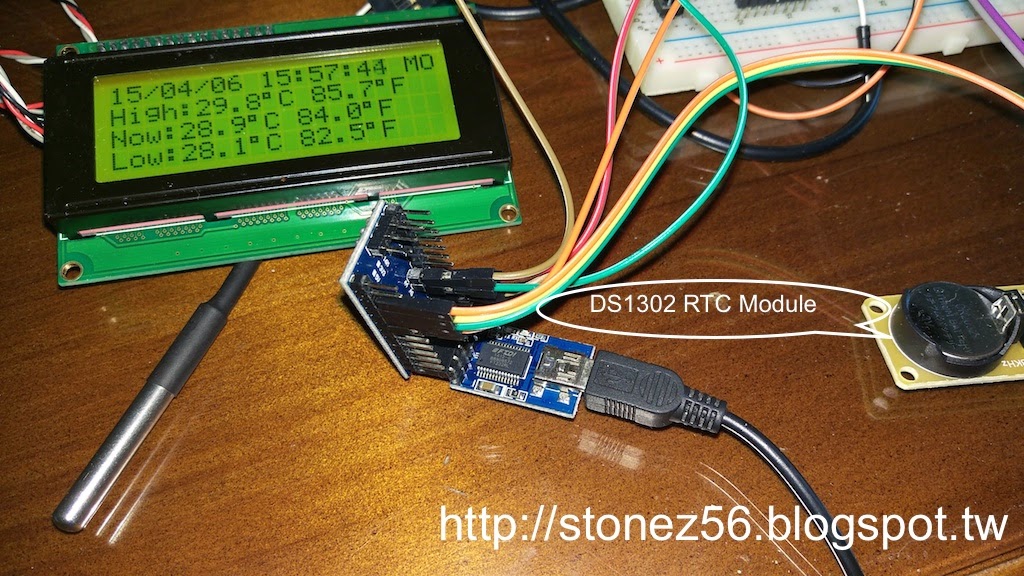
DS1302 RTC Module Wiring:

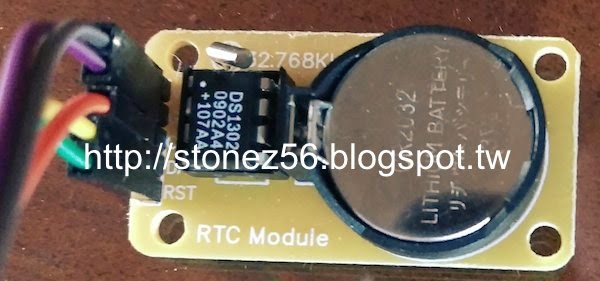
所以我上網找了Arduino 與時間相關的資訊,也很快的找到了 DS1302/DS1307 RTC 時鐘模組可以記錄時間,而且即使系統斷電時,時鐘模組可以依靠著內建的 2302 水銀電池來維持時間運作。
搜尋資訊的同時,很多人都提到 DS1302/DS1307不是很準確,用一段時間就會慢個幾秒鐘, 但是它相對便宜,所以我就買了兩片DS1302回來試試囉! 請參考 DS1302 RTC 詳細介紹
這次的的教學主要是以如何加入 DS1302 RTC 模組. 如果你要做一個完整的測量機,請先參考上一篇: 自製溫度測量機
把 DS1302 RTC 模組加入到電路中不難,但是我遇到了一些很奇怪的問題,如只能顯示單數秒之類的。還好 Google+ 社群裡有許多朋友給了我建議及方向,讓我能及時把程式寫好並測試完成 。相關討論 Google+ discussion
使用 DS1302 RTC 主要的注意事項如下:
所需材料:
DS1302 RTC 模組接線:
One of the readers suggested me if I could record the highest and lowest temperatures measured into EEEPROM, then I won't lost the highest/lowest temperature once power is down. It's a good idea, but I thought, it would be a greater idea if I kept both time stamp and high/low temperatures!
(Writing data to EEEPROM tutorial would be in V3....unfortunately...)
So, I searched Arduino.cc website and found abundant information about DS1302/DS1307 RTC clock modules. Many people mentioned in forums that DS1302/DS1307 are not very precise and tend to draft of few seconds per week/month. However, DS1302 is quite affordable, so I bought 2 pieces from an auction sites and to give it a try. Reference DS1302RTC data at Arduino.cc
All steps, material, and wiring here are only related DS1302 RTC module. If you want to learn how to build up the entire project, please check previous tutorial for how to wire up LCD, Arduino, and DS18B20 temperature probe from here: Arduino-Temperature-Tutorial
During the experiment of adding RTC module, I have encountered few issues and got few advises and suggestions from Google+ communities: Google+ discussion
If you need Arduino Libraries, come here:
Get DallasTemperature Arduino Library here!
Get OneWire Arduino Library here!
Few notices to share with you:
(Writing data to EEEPROM tutorial would be in V3....unfortunately...)
So, I searched Arduino.cc website and found abundant information about DS1302/DS1307 RTC clock modules. Many people mentioned in forums that DS1302/DS1307 are not very precise and tend to draft of few seconds per week/month. However, DS1302 is quite affordable, so I bought 2 pieces from an auction sites and to give it a try. Reference DS1302RTC data at Arduino.cc
Functions added in Temperature V2:
- Display date/time clock and date of week on top of LCD
- Realtime display both Celsius and Fahrenheit
During the experiment of adding RTC module, I have encountered few issues and got few advises and suggestions from Google+ communities: Google+ discussion
If you need Arduino Libraries, come here:
Get DallasTemperature Arduino Library here!
Get OneWire Arduino Library here!
Few notices to share with you:
- Arduino has internal Time library (Really, I don't know before I started this!)
- Use the internal clock to count time elapsed
- Only update time from RTC module once a day
- Remove unnecessary delay() commands to ensure every second is displayed

- DS1302 RTC module
- Few jumper wires

DS1302 RTC Module Wiring:
- VCC to Arduino VCC
- GND to Arduino GND
- CLK to Arduino pin 5
- DAT to Arduino pin 6
- RST to Arduino pin 7
Arduino Temperature Meter Schematic V2

Video Demonstration
Code: <
Copyright Notice:
You are welcome to share this tutorial with others, please retain author's name and URL link to this tutorial blog page. Thank you!
---------------------------------------------------------------------------------------------
在上一次的教學中, 我已示範過如何用 Arduino + 溫度測量棒 + LCD 來 自製溫度測量機 。
有讀者看到上一個教學後建議我把最高溫及最低溫的資訊記錄到EEEPROM裡,這樣高低溫資訊才不會遺失。 聽起來很不錯,但如果能把時間+高低溫也一起記錄下來, 應會更好。Code: <
/*
Temperature Meter 2015-04-05

Material Needed:
- Arudino Mini Pro * 1
- LCD Module 4 x 20 (J204A) * 1
- Temperature Probe (DS18B20) * 1
- Protoboard * 1
- 22k resistor * 1
- Few jumper wires

Wiring:
- Arduino-GND to GND
- Arduino-VCC to VCC
- Temperature probe-GND to GND
- Temperature probe-VCC to VCC
- Temperature probe-Data to 2.2K resistor to VCC
- LCD-GND to GND
- LCD-VCC to VCC
- LCD-SDA to Arduino A4/SDA
- LCD-SLC to Arduino A5/SLC
- Protoboard VCC/GND to 5V DC power source
- Slide switch to VCC/GND (For LCD on/Off, but not shown below)
*/
//Compatible with the Arduino IDE 1.0
//Library version:1.1
#include <Wire.h>
#include <LiquidCrystal_I2C.h>
//Used for DS18S20 Temperature sensor
#include <OneWire.h>
#include <DallasTemperature.h>
//Used for DS1302 RTC Clock module
#include <DS1302RTC.h>
#include <Time.h>

//Init DS1302 Clock module
//Set pins: CLK(4), DAT(5), RST(6)
  int CE = 5;
  int IO = 6;
  int CLK = 7;

  String DayOfWeek;
  unsigned long previous_time;
  unsigned long secondsInDay = 86400 * 1000; //1000 millis seconds in a second!
  int sync = 0;

  DS1302RTC RTC(CE, IO, CLK);

  //init Arduino internal clock
  time_t t = now();


/*Define for DS18S20 data pins
*  This data pins needs to connect 220 Om resister and to 5V to work
*/
#define ONE_WIRE_BUS 4

//Define for LCD display pins, SLC 3, SDA 2
#define SCL_CLOCK_PIN 3
#define SDA_DATA_PIN 2

//Initialize OneWire library for temperature sensor
OneWire oneWire(ONE_WIRE_BUS);
DallasTemperature sensors(&oneWire);

// set the LCD address to 0x27 for a 20 chars and 4 line display
LiquidCrystal_I2C lcd(0x27,20,4);


float HighestTemp = 0.0;
float CurrentTemp = 0.0;
float LowestTemp = 0.0;

void setup()
{
  //Serial.begin(9600);
  // start temperature sensor
  sensors.begin();
  sensors.requestTemperatures(); //get temperature
  // initialize the LCD
  //You may setup your own clock pin(SCL), data pin(SDA) 2013-12-14
  //Wire.beginOnPins(SCL_CLOCK_PIN, SDA_DATA_PIN);
  lcd.init();
  lcd.backlight();

  //Set lowest, highest temperatues
  CurrentTemp  = sensors.getTempCByIndex(0);
  HighestTemp = CurrentTemp;
  LowestTemp = CurrentTemp;


  //Show Temperature Meter wording...
  lcd.setCursor(0,1);
  lcd.print(F("Temperature Meter V2"));
  lcd.setCursor(0,2);
  lcd.print(F("  by Stonez Chen"));
  delay(2000);
  //clear LCD
  lcd.clear();

  lcd.setCursor(0,1);
  lcd.print(F("High:"));
  LCDshowNum(5,1,HighestTemp);

  lcd.setCursor(0,2);
  lcd.print(F("Now:"));
  LCDshowNum(4,2,CurrentTemp);

  lcd.setCursor(0,3);
  lcd.print(F("Low:"));
  LCDshowNum(4,3,LowestTemp);


  //Check DS1302 Clcock module time
  if(RTC.haltRTC()){
      lcd.setCursor(0,0);
      lcd.print(F("1302 Stop,do SetTime"));
  }

  //Read time from DS1302 moudle and setup internal clock
  setSyncProvider(RTC.get);
  while(timeStatus() != timeSet){
        setSyncProvider(RTC.get);
  }

  t = now();

  if(timeStatus() == timeSet){
        previous_time = millis();
        /*
        Serial.println("Init Year = " + String(year(t)));
        Serial.println("Init Month = " + String(month(t)));
        Serial.println("Init Day = " + String(day(t)));
        Serial.println("Init Hour = " + String(hour(t)));
        Serial.println("Init minute = " + String(minute(t)));
        Serial.println("Init second = " + String(second(t)));
        */

  }else{
        //Serial.println("Time not set!");
  }

}

void loop()
{
    unsigned long current_time = millis();
    unsigned long time_passed;

    //Sync clock every 24hr(secondsInDay)
    time_passed = current_time - previous_time;
    if(time_passed >= secondsInDay){
       setSyncProvider(RTC.get);
       sync++;
       previous_time = current_time;
    }

   //mark when RTC.get again!
  //Serial.print(" Time_passed = " + String(time_passed));
  //Serial.println(" Synced :" + String(sync));
  //lcd.setCursor(18,3);
  //lcd.print(sync);

  //Print Date time on the first line
  lcd.setCursor(0,0);
  lcd.print(printYMDHMS());


  sensors.requestTemperatures(); //get temperature

  //Get Current
  CurrentTemp = sensors.getTempCByIndex(0);
  LCDshowNum(4,2,CurrentTemp);

  //Check if Hightest
  if(CurrentTemp > HighestTemp){
     HighestTemp = CurrentTemp;
     LCDshowNum(5,1,HighestTemp);
  }

  //Chekc if Lowest
  if(CurrentTemp < LowestTemp){
    LowestTemp = CurrentTemp;
    LCDshowNum(4,3,LowestTemp);
  }
  delay(200);

}

/*
* LCDshowNum
* LCD display location: x, y
* Float n: temperature to display
*/
void LCDshowNum(int x, int y, float n){
  lcd.setCursor(x,y);
  lcd.print(n,1); //,1 means print 1 decimal
  lcd.print(char(223));
  lcd.print("C ");
  lcd.print(((n*1.8)+32),1);//,1 means print 1 decimal
  lcd.print(char(223));
  lcd.print("F ");
}

/*
* This function return YYMMDD HHMMSS string from internal clock
*/
String printYMDHMS(){

  String DayOfWeek = "";
  t = now(); //update internal clock

  switch (weekday(t)){
      case 7:
        DayOfWeek = " SA";
        break;
      case 6:
        DayOfWeek = " FR";
        break;
      case 5:
        DayOfWeek = " TH";
        break;
      case 4:
        DayOfWeek = " WE";
        break;
      case 3:
        DayOfWeek = " TU";
        break;
      case 2:
        DayOfWeek = " MO";
        break;
       case 1:
        DayOfWeek = " SU";
        break;
    }

    return
      String(year(t)).substring(2,4) + '/' +
      String(print2digits(month(t))) + '/' +
      String(print2digits(day(t))) + ' ' +
      String(print2digits(hour(t))) + ':' +
      String(print2digits(minute(t))) + ':' +
      String(print2digits(second(t))) +
      DayOfWeek;
}
/*
* Add 0 to the single digit number to better align the text
*/

String print2digits(int number) {
  if (number >= 0 && number < 10){
    return '0'+String(number);
  }else{
    return(String(number));
  }
}
Copyright Notice:
You are welcome to share this tutorial with others, please retain author's name and URL link to this tutorial blog page. Thank you!
---------------------------------------------------------------------------------------------
自製 Arduino 溫度測量機 V2
所以我上網找了Arduino 與時間相關的資訊,也很快的找到了 DS1302/DS1307 RTC 時鐘模組可以記錄時間,而且即使系統斷電時,時鐘模組可以依靠著內建的 2302 水銀電池來維持時間運作。
搜尋資訊的同時,很多人都提到 DS1302/DS1307不是很準確,用一段時間就會慢個幾秒鐘, 但是它相對便宜,所以我就買了兩片DS1302回來試試囉! 請參考 DS1302 RTC 詳細介紹
溫度測量機 V2 新增功能
- 顯示日期 時間 星期
- 顯示攝氏 及 華氏
把 DS1302 RTC 模組加入到電路中不難,但是我遇到了一些很奇怪的問題,如只能顯示單數秒之類的。還好 Google+ 社群裡有許多朋友給了我建議及方向,讓我能及時把程式寫好並測試完成 。相關討論 Google+ discussion
使用 DS1302 RTC 主要的注意事項如下:
- Arduino 有內建 Time 程式庫 (說真的,開始寫程式時,我還真的不知道哩! Orz...)
- 使用Arduino內建的時鐘來當計時器即可!
- 每天只要向 RTC 模組要一次時間來更新 Arduino內建時鐘即可
- 檢視一下程式中如果用到 delay() 次數及時間長短,它會顯嚮秒數的顯示
- DS1302 RTC 時鐘模組
- 跳線數根
DS1302 RTC 模組接線:
- VCC to Arduino VCC
- GND to Arduino GND
- CLK to Arduino pin 5
- DAT to Arduino pin 6
- RST to Arduino pin 7
Arduino 溫度測量機線路圖 V2
影片展示
程式碼: (請參考英文版部份)
Copyright Notice:
You are welcome to share this tutorial with others, please retain author's name and URL link to this tutorial blog page. Thank you!
程式碼: (請參考英文版部份)
Copyright Notice:
You are welcome to share this tutorial with others, please retain author's name and URL link to this tutorial blog page. Thank you!


Hello its awesoem project can you share your code if its possible pls.
ReplyDeleteSure! I just realize that I didn't post the source code here. Will do to soon over the weekend.
DeleteHi! I've put all the source code here!
DeleteSorry for so late!