Showing posts with label Arduino. Show all posts

2025/12/11

CrowPanel ESP32 5.79" 電子紙開箱+PlatformIO 實作教學(含天氣 API 範例)

前言

大家好,我是 Stonez56。這篇文章要帶大家一起來看看 Elecrow 推出的 CrowPanel ESP32 5.79 吋電子紙 HMI Display,並示範如何把官方 Arduino Demo 改成 PlatformIO 專案,最後成功顯示 OpenWeather 的即時天氣資訊。

如果你習慣用 VS Code + PlatformIO 開發 ESP32,這篇文章會非常適合你。


✅ 一、CrowPanel ESP32 5.79" 電子紙開箱

這次收到的是一片 5.79 吋的 E‑Paper HMI Display,內建 ESP32‑S3,支援 Wi‑Fi 與 Bluetooth,並提供多種介面:

  • SPI

  • UART

  • GPIO

  • TF/SD 卡

  • USB

  • 電池接頭

電子紙本身是黑白顯示,適合做低功耗、長時間顯示的應用。

📦 盒內內容

  • CrowPanel ESP32 5.79" 電子紙模組

  • USB 連接埠

  • SD 卡槽

  • 三個操作按鈕(Home / Back / Dial Switch)

✅ 二、內建 Demo 介紹

接上電後,電子紙會自動跑內建 Demo,包括:

  • 圖片顯示

  • 簡單 UI 操作

  • 情境控制(Scenario)

    • Living Room

    • Bedroom

    • Dining Room

    • Kitchen(可切換 On/Off)

電子紙在更新畫面時會閃爍一下,這是正常現象。


✅ 三、產品規格整理

項目規格
顯示尺寸5.79 吋
解析度272 × 792
顯示顏色黑 / 白
驅動 ICSSD1683 × 2(並排)
MCUESP32‑S3
Flash / PSRAM8MB
介面SPI / UART / GPIO / TF 卡 / USB
電壓2.2V – 3.7V
特點Partial Refresh、低功耗、廣視角


✅ 四、電子紙的特性與注意事項

✅ 1. 低更新速度(Low Refresh Speed)

電子紙更新畫面時需要閃爍幾次,因此比較適合:

  • 靜態畫面

  • 少量更新的資訊(例如:天氣、溫度、濕度)

✅ 2. 高對比度(Contrast)

在光線充足的環境下非常清晰。 但在昏暗環境下需要外部光源。

✅ 3. 無灰階、無彩色

電子紙只有黑白兩色。 灰階可以透過「抖動(dithering)」方式模擬。


✅ 4. Partial Refresh

可以只更新某個區塊,省電又快速。

✅ 五、開始實作:把官方 Arduino Demo 改成 PlatformIO 專案

官方提供的 Demo 在 GitHub 上,但原始結構是 Arduino IDE 用的。 我們要做的是:

✅ 下載 Demo ✅ 改成 PlatformIO 專案格式 ✅ 加入 credentials.h ✅ 修改城市與 API Key ✅ 編譯、燒錄、顯示天氣資訊

✅ Step 1:下載官方 Demo

官方 Wiki 提供 Arduino 範例:

程式碼
5.79_wifi_http_openweather

你可以從 Elecrow Wiki 或 GitHub 下載。 我也把整理過的版本放在自己的 GitHub Repo,方便直接使用。

✅ Step 2:建立 PlatformIO 專案

  1. 開啟 VS Code

  2. 點 PlatformIO

  3. New Project

  4. 專案名稱:epaper

  5. 開發板:esp32-s3-devkitm-1

✅ Step 3:整理檔案結構(PlatformIO 必做)

Arduino Demo 通常是 .ino,但 PlatformIO 需要:

  • .cpp 放在 /src

  • .h 放在 /include

✅ 你需要做:

  1. 5.79_wifi_http_openweather.ino 改名為: main.cpp

  2. 所有 .cpp/src

  3. 所有 .h/include

✅ Step 4:新增 credentials.h(存放 Wi‑Fi 與 API Key)

/include 新增:

程式碼
credentials.h

內容格式:

cpp
#define WIFI_SSID "你的 Wi-Fi 名稱"
#define WIFI_PASSWORD "你的 Wi-Fi 密碼"
#define OPENWEATHER_API_KEY "你的 API Key"


✅ 這樣可以避免把敏感資訊寫死在 main.cpp 裡。

✅ Step 5:修改 main.cpp(城市與國家代碼)

找到:

cpp
String city = "Hsinchu";
String countryCode = "TW";

改成你自己的城市與國家代碼。

如果不知道代碼,可以問 AI 或查 OpenWeather 網站。

✅ Step 6:編譯與燒錄

  1. 接上 USB

  2. 點 PlatformIO → Upload

  3. 等待燒錄完成

  4. 開啟 Serial Monitor(建議 delay 設 10 秒)

✅ 六、成果展示:電子紙顯示即時天氣

燒錄成功後,電子紙會顯示:

  • 溫度

  • 濕度

  • 可見度

  • 風速

  • 天氣狀態(Mist、Clouds…)

你影片中示範的是新竹的天氣資訊,顯示效果非常清晰。


✅ 七、結語:這片電子紙可以做什麼?

CrowPanel ESP32 5.79" 電子紙非常適合:

  • 天氣看板

  • IoT Dashboard

  • 電子標籤(Shelf Label)

  • 智慧家庭控制面板

  • 低功耗資訊顯示器

如果你有想做的應用,也歡迎在影片底下留言分享。


2025/01/17

u8g2 字型產生器網站 / u8g2 uni-font generator web site (stonez56.com/u8g2)

開發 Arduino / ESP32 顯示器 (OLED/LCD) 相關專案時, 常會用到的中文字型, 一般都會採用 u8g2 字型庫, 不過它內建的使用方法較不方便, 需要手動下指令, 或是把一整個字型檔全部帶入, 造成記憶體的浪費.

介紹一個我開發的 u8g2 中文產生器網站. 只要打入要你的中文, 日文, 韓文, 或是其它 UTF-8 的文字, 它都可以幫你快速的產生字型檔, 使用時, 只要把產生字型檔帶入即可, 方便, 快速, 節省大量的記憶體. 

有需要的朋友快來試試吧~ https://stonez56.com/u8g2 


詳細的的字型使用方法也可以參考這裡: https://youtu.be/Ksdwd87JpPs 

Happy weekend!! 😁


-------------------------------------------------------

When developing Arduino/ESP32 projects with displays, Chinese /Japanese/Korean and other UTF fonts are often needed. The u8g2 font library is commonly used, but its built-in usage is inconvenient, requiring manual commands or loading the entire font file, which wastes memory.

I'm introducing a u8g2  font generator website I developed. Just enter the Chinese, Japanese, Korean, or other UTF-8 text you need, and it can quickly generate font files for you. When using them, simply include the generated font file, which is convenient, fast, and saves a lot of memory.

If you're interested, please give it a try! https://stonez56.com/u8g2

You can also refer to this link for detailed instructions on how to use the fonts: https://youtu.be/-bntyE8UYTY

Happy weekend!! 😁

2024/10/10

Stonez56 創客工坊 開幕了~ 誠摯的邀請大家加入FB社團~

Stonez56 創客工坊 開幕了~ 誠摯的邀請大家加入FB社團~
https://www.facebook.com/groups/stonez56


您好!我是 Kevin Chen,也是 Stonez56。作為一位資訊/電子技術愛好者,我在各種平台上分享我的知識和專案,旨在幫助他人學習和實踐技術。

在這個社團中,我將分享我的經驗和知識,包括:

Arduino 和 IoT 的教學和專案分享:從基本的 Arduino 教學到 IoT 專案的實踐,我將分享我的經驗和知識。

應用程式開發:我將分享我的 App Inventor 教程,幫助您創建自己的 App Inventor 應用程式。

博客分享:我將分享我的週末專案和其他技術相關內容,讓您了解最新的技術趨勢。

我的目標是教育性地幫助他人學習和實踐技術,特別是在 Arduino 程式設計和App應用程式開發及AI等領域。您可以在這裡與我和其他技術愛好者交流、學習和分享您的經驗。

我住在台灣新竹,歡迎您加入這個社團,與我一起探索技術世界!讓我們一起學習、分享和創造!

從 Arduino, ESP32, App Inventor, Raspberry Pi 都有. 如果你有需要個人教學或是團體授課, 請聯絡我!


2024/06/13

Arduino #43使用LoRa模組,輕鬆實現長距離免費通訊!(How to use LoRa modules with ESP32 for long distance communication)

 歡迎來到本週的Weekend project with Stonez56!你準備好體驗超炫的科技應用了嗎?本週的主題是使用Arduino #43 LoRa模組,輕鬆實現長距離免費通訊!

這次的影片內容可謂豐富多元,包括以下精彩部分:


* 什麼是LoRa技術以及其應用

* 使用ESP32 LED燈顯示連線狀態,簡單易懂

* 深入探索LoRa模組,一步步教你如何使用

* 教你使用SSD1306 OLED顯示器,方便實用

* 帶你體驗DHT11溫濕度感測器,監測環境變化

* 最後還有程式碼解說,讓你輕鬆上手


這次的Weekend project一定不會讓你失望,絕對值得一看!快來點開影片,體驗科技的樂趣吧!


00:00 開始 00:16 本集影片概要 02:12 LoRa 適用的場合 02:42 RYLR998 LoRa 模組的特性 04:17 使用前所需之基本設定 07:12 AT Command 設定實作(以 VS Code做設定) 09:45 點對點連線實際運作展示 11:15 發射端程式解析 21:00 接收端程式解析


Source code:

2023/01/02

Arduino #42集, “快速取得u8g2的字型代碼” (Get u8g2 unifont code quick & easy, u8g2 のフォント コードをすばやく取得する」です, u8g2용 폰트코드 빠르게 받아보기" 입니다)

歡迎收看Weekend project with Stonez56。 
本周是Arduino #42集, “快速取得u8g2的字型代碼”
我們將使用Stonez56 這個網站來快速取得字型代碼

目前為測試版: https://stonez56.com/u8g2/

這個 Stonez56 轉碼網站過人之處:

* 簡單易用用省時
* 自動移除重複字
* 產生極小的檔案 

使用方法簡單:

* 輸入你要轉換的字詞
* 按下送出
* 下載產生的字型代碼
* 存到 Arduino 專案目錄下
* 在你的主程式中, 用 include 帶進 字型.h 程式
* 用 u8g2.setFont(u8g2_font_unifont_myfonts) 

目前為測試版: https://stonez56.com/u8g2/


===========================
Stonez56 の Weekend プロジェクトへようこそ。
今週は Arduino #42 のエピソード「u8g2 のフォント コードをすばやく取得する」です。
Web サイト Stonez56 を使用して、フォント コードをすばやく取得します。

現在ベータ版:https://stonez56.com/u8g2/

この Stonez56 トランスコーディング サイトの優れた点:
*使いやすく、時間を節約
*重複する単語を自動的に削除
* 非常に小さいファイルを生成します

使いやすい:
*変換したい単語を入力してください
※押すと送信されます
* 生成されたフォント コードをダウンロードする
* Arduino プロジェクト ディレクトリに保存します。
* メイン プログラムで、include を使用して font.h プログラムを取り込みます。
* u8g2.setFont(u8g2_font_unifont_myfonts) を使用

現在ベータ版:https://stonez56.com/u8g2/


=============================
Stonez56과 함께하는 주말 프로젝트에 오신 것을 환영합니다.
이번주는 아두이노 #42편 "u8g2용 폰트코드 빠르게 받아보기" 입니다.
Stonez56 웹 사이트를 사용하여 글꼴 코드를 빠르게 얻습니다.

현재 베타 버전: https://stonez56.com/u8g2/

이 Stonez56 트랜스코딩 사이트의 장점:
* 사용하기 쉽고 시간을 절약
* 중복 단어 자동 제거
* 매우 작은 파일 생성

사용하기 쉬운:
* 변환하려는 단어를 입력하십시오
* 누르면 보내기
* 생성된 글꼴 코드 다운로드
* Arduino 프로젝트 디렉토리에 저장
* 기본 프로그램에서 include를 사용하여 font.h 프로그램을 가져옵니다.
* u8g2.setFont(u8g2_font_unifont_myfonts) 사용

현재 베타 버전: https://kidsgo.net/u8g2/

#arduino #u8g2 #font #lcd #display #weekendprojectwithstonez56 #diy #maker #oled #esp32 #esp8266 #stonez56 #fontgenerator #kidsgo.net #CJKfonts #CJK

2022/12/04

App Inventor #11自己來寫 App - 骰子遊戲 (Dice Game)

大家好, 歡迎收看本週的Weekend project with Stonez56。 

本周要進行的是 App Inventor 第10集 -  自己來寫 App - 骰子遊戲

這個影片適合稍進階同學來觀看&學習, 想要越級挑戰的朋也也歡迎拿來這個單元來學習 App Inventor 2! 

這是一個學習任意組件的好範例, Android, iPad 都可以使用!


本次教學你可以學到:

 * 本集會使用到:

 * 感測器 (Sensor)

 * 變數應用 (Variables)

 * 清單的應用 (List)

 * 圖片的應用 (Image)

 * 為APP加上音音效 (Audio)

 * 亂數的應用 (Randomized)

 * 用任意組件 (Any component)

 * 程序的應用 (Procedure)


參考資料: 

App inventor 語法 & 使用方式: http://ai2.appinventor.mit.edu/reference/blocks/ 

音效來源: https://pixabay.com/ 

圖片製作:  https://figma.com 


如果你時間不夠, 也可以從以下的時間軸挑選想看的部份即可! 


影片時間軸: 

00:00 開始

00:24 骰子 App 示範

01:20 App 畫面的配置 / 素材上傳

04:39 App 程式設計

05:18 如何使用變數/變數種子

06:31 設定音效

11:54 如何使用任意元件

15:22 使用任意組件來移除重複的運算

16:26 把骰子元件放入清單中

23:11 使用任意組件 vs 未使用任意組件


App Inventor 相關教學影片:


* App Inventor #11自己來寫 App - 骰子遊戲 (Dice Game)

https://youtu.be/2d6Si6u8FVE


* App Inventor #10 集 自己來寫 APP YouBike 2.0 (下). 

https://youtu.be/Cli-_lUPjgU


* App Inventor #9 集 - 自己來寫 APP YouBike 2.0 (上) 

https://youtu.be/D78-eDRFiXM


*App Inventor #8 AI2 Companion 一直斷線怎麼辦? AI2 小技巧 (How to keep AI2 always connected for Android) https://youtu.be/_HeM9GyVmIE


* App Inventor #7 ESP32 語音辨識控制 IOT 專案, 使用 IoT Essential Library Example (CC available)  https://youtu.be/senjdb-cREY


* App Inventor #6 使用’ 繪圖動畫' 製作使用者介面 (App Inventor 2 UI design with Draw and Animation) https://youtu.be/RfYi8h9y6kE


* App Inventor #5 - “無線搖控 ESP32-CAM APP 下集 (Write ESP32-CAM remote APP 2/2) https://youtu.be/J8b3zWX1FXM


* App Inventor #4 無線搖控 ESP32-CAM APP 上集 (Write ESP32-CAM remote APP 1/2)

https://youtu.be/x545mFSZWgg


* App Inventor #3 “自己來寫APP 快篩何處買?” (How to process .csv files in App Inventor)

https://youtu.be/u5J4FJQ5UQQ


* App Inventor #2 “自己來寫mqtt APP Android & iOS都能用” (Create MQTT Apps with App Inventor 2)

https://youtu.be/kIONEfLO4sI


* MIT App Inventor 2 #1 - 語音辨識 (Voice Recognition)

https://youtu.be/msV4V6af6tA 

2022/11/06

Arduino #38 YouBike 2.0 餘車通知器 (Arduino #38 ESP32 1306 YouBik 2.0 remain notifier)

大家好, 歡迎收看本週的Weekend project with Stonez56。 

本周要進行的是Arduino 第38集 -  UBike 2.0 餘車通知器.


大多數坐捷運上下班的朋友, 一定有這樣的經驗:下班時,匆匆忙忙趕到捷運站,卻發現捷運站的Ubike已經都沒有了, 只好在那邊癡癡的等候.

如果下班之前, 看一下YouBike 2.0, 餘車通知器, 確定站點還有較多的Ubike, 這時候再過去牽車, 是不是很安心呢? 我們來看看怎麼做吧!


如果你時間不夠, 也可以從以下的時間軸挑選想看的部份即可! 

影片時間軸:

00:00 開始

00:43 UBike 2.0 餘車通知器使用方法

03:22 Google Sheet 設定

14:44 Google Sheet 發佈API設定

17:19 Google Script doPost(e) 程式解釋

20:27 Google Script doGet(e) 程式解釋

21:46 ESP32 程式解釋

26:51 ESP32 refreshYouBike2data (更新SHEET資料)

28:52 ESP32 goGetData 由Sheet取得資料

30:03 showUTF8String 顯示餘車資料


App Inventor 相關教學影片:

* App Inventor #11自己來寫 App - 骰子遊戲 (Dice Game)
https://youtu.be/2d6Si6u8FVE

* App Inventor #10 集 自己來寫 APP YouBike 2.0 (下).
https://youtu.be/Cli-_lUPjgU

* App Inventor #9 集 - 自己來寫 APP YouBike 2.0 (上)
https://youtu.be/D78-eDRFiXM

*App Inventor #8 AI2 Companion 一直斷線怎麼辦? AI2 小技巧 (How to keep AI2 always connected for Android) https://youtu.be/_HeM9GyVmIE

* App Inventor #7 ESP32 語音辨識控制 IOT 專案, 使用 IoT Essential Library Example (CC available)  https://youtu.be/senjdb-cREY

* App Inventor #6 使用’ 繪圖動畫' 製作使用者介面 (App Inventor 2 UI design with Draw and Animation) https://youtu.be/RfYi8h9y6kE

* App Inventor #5 - “無線搖控 ESP32-CAM APP 下集 (Write ESP32-CAM remote APP 2/2) https://youtu.be/J8b3zWX1FXM

* App Inventor #4 無線搖控 ESP32-CAM APP 上集 (Write ESP32-CAM remote APP 1/2)

https://youtu.be/x545mFSZWgg

* App Inventor #3 “自己來寫APP 快篩何處買?” (How to process .csv files in App Inventor)

https://youtu.be/u5J4FJQ5UQQ

* App Inventor #2 “自己來寫mqtt APP Android & iOS都能用” (Create MQTT Apps with App Inventor 2)   https://youtu.be/kIONEfLO4sI

* MIT App Inventor 2 #1 - 語音辨識 (Voice Recognition)
https://youtu.be/msV4V6af6tA 

2022/08/14

Android #36 IoT 基本程式庫 Wifimanager FOTA MQTT (IOT Essential Code base with wifimanager, ElegantOTA, & MQTT)

Hi, Welcome to weekend project with Stonez56

This week's Arduino episode #37, "Essential IoT Code Base- Wifimanager FOTA + MQTT"

Here is the source code: https://stonez56.blogspot.com/2022/08/android-36-iot-wifimanager-fota-mqtt.html 


Today, I will show how to combine three commonly used IoT libraries;

WiFimanager, AsyncElegantOTA, and MQTT To become a common IoT code base. So, for our future projects, ESP8266 or ESP32, would have these basic functions.

Let's first look at these three libraries:

  • Wifimanager = Wi-Fi password management, no need to re-burn the code to change the Wi-Fi SSID & password
  • FOTA = Use Wi-Fi to update ESP32 code, you can burn code without connecting to USB
  • MQTT = Streamlined and lightweight communication protocol (Message Queueing Telemetry Transport)


This episode will only introduce how to integrate MQTT into Wifimanager + AsyncElegantFOTA.

To learn how to start Wifimanager + AsyncElegantOTA, Please watch Android #27 Wifimanager + OTA for ESP32/ESP8266 (ESPAsyncWifimanager / ESPAsyncElegantOTA)) https://youtu.be/UlRLTvl4DRc 


==References==

Arduino Library URL:


==Sample code URL==

ESPAsync_WiFiManager minimal: https://github.com/khoih-prog/ESPAsync_WiFiManager/blob/master/examples/Async_AutoConnect_ESP32_minimal/Async_AutoConnect_ESP32_minimal.ino 


ESP32 Async OTA : https://github.com/ayushsharma82/AsyncElegantOTA/blob/master/examples/ESP32_Async_Demo/ESP32_Async_Demo.ino 


If you don't have enough time, you can also select the part you want to watch from the timeline below!

Video Timeline: 00:00 Start 01:39 Demonstration of project results 01:57 mqttgo.io MQTT server, free, fast, & stable 05:52 Install three libraries 07:14 Added two ESP32 PINs as MQTT example 07:41 Encrypt the firmware update (ElegantOTA) page 11:44 Explain how the MQTT callback function works 13:07 Control ESP32 I/O pins with MQTT 15:16 Future program can be written from here

=====中文版本======

大家好, 歡迎收看本週的Weekend project with Stonez56。 

本周要進行的是 Arduino 第36集,"IoT 基本程式庫 - Wifimanager FOTA + MQTT”

今天來跟大家介紹如何把 一般的 IoT 專案常用到的三個程式庫,  WiFiManager 以及WiFi 韌體更新FOTA (Firmware Over the Air), 再加上 MQTT 三個整合在一起, 變成一個常用的 Code base.  往後你的 ESP32 IoT 專案呢, 就可以俱備這些基本功能了! 


  • Wifimanager = WiFi 密碼管理, 不用重新燒 Code 改 Wifi SSID & 密碼
  • FOTA = 用Wi-Fi更新ESP32程式碼, 不用接USB就可以燒Code
  • MQTT = 精簡輕量化的通訊協定(Message Queueing Telemetry Transport)


本集僅會介紹如何把 MQTT 整合到 Wifimanager + AsyncElegantFOTA

若想了解如何整合 Wifimanager + AsyncElegantOTA, 

請觀看 Arduino #26 AsyncWifimanager ElegantOTA ESP32 (WiFi 密碼管理+ WiFi 韌體更新) https://youtu.be/zepkinJ46Zg  


==參考資料==

Arduino Library URL: 


==Sample code URL==


如果時間不夠的朋友, 也可以從以下的時間軸挑選想看的部份即可! 

影片時間軸:

影片時間軸: 00:00 Start 01:39 專案成果示範 01:57 mqttgo.io 快速免費的 MQTT 伺服器 05:52 安裝三支程式庫 07:14 加入兩個 ESP32 PIN做為MQTT範例 07:41 為韌體更新(ElegantOTA)頁面加密 11:44 說明MQTT callback 函數運作方式 13:07 MQTT由此控制ESP32 PIN 15:16 把你的程式可以寫在這裡


IoT基本程式庫原始程式:


/** 
 * Arduino code base for IoT Projects
 * By: Stonez56 aka Kevin Chen 2022-08-16
 * 
 * This source code combined three most common Arduino libraries for IoT Projects, 
 * ESPAsync_Wifimanager, AsyncElegantOTA, & Pubsubclient MQTT Client.
 * 
 * 1. ESPAsync_WiFiManager: https://github.com/khoih-prog/ESPAsync_WiFiManager 
 * 2. AsyncElegantOTA: https://github.com/ayushsharma82/AsyncElegantOTA 
 * 3. Pubsubclient MQTT Client: https://github.com/knolleary/pubsubclient 
 * 
 * YouTube video: https://youtu.be/giFHp9RSMvQ
 * Source code is available my blog: https://stonez56.blogspot.com/2022/08/android-36-iot-wifimanager-fota-mqtt.html 
 **/

/*
 * Define Relay pins as examples to send/receive MQTT messages
 * **/
#define RELAY_PIN_1 12
#define RELAY_PIN_2 14

/** 
 * Perform OTAs for ESP8266 / ESP32 Elegantly with password protection! 
 * https://github.com/ayushsharma82/AsyncElegantOTA
 * **/
#include <AsyncElegantOTA.h>
const char *FOTA_USERNAME = "un";
const char *FOTA_PASSWORD = "pw";

/** 
 * Add MQTT client here` PubSubClient V2.8 by Nick O'Leary
 * https://github.com/knolleary/pubsubclient 
*/
#include <WiFiClient.h>
#include <PubSubClient.h>
#define MSG_BUFFER_SIZE (1024)
char msg[MSG_BUFFER_SIZE];

/** Taiwan No. 1 Free MQTT Server!! **/
const char *mqtt_server = "mqttgo.io";
const int mqtt_port = 1883;

/****************************************************************************************************************************
  Async_AutoConnect_ESP32_minimal.ino
  For ESP8266 / ESP32 boards
  Built by Khoi Hoang https://github.com/khoih-prog/ESPAsync_WiFiManager
  Licensed under MIT license
 *****************************************************************************************************************************/
#if !(defined(ESP32))
#error This code is intended to run on the ESP32 platform! Please check your Tools->Board setting.
#endif
#include <ESPAsync_WiFiManager.h> 
AsyncWebServer webServer(80);

//Start DNS server
DNSServer dnsServer;

//MQTT - Start WiFi client and connect to MQTT server
WiFiClient espClient;
PubSubClient mqtt_client(espClient);

//Define device name
String DEVICE_NAME = "Dual_Relay_Switch";
String home_page_message = "";

void setup()
{
    Serial.begin(115200);
    pinMode(RELAY_PIN_1, OUTPUT);
    pinMode(RELAY_PIN_2, OUTPUT);

    while (!Serial)
        ;
    delay(200);
    Serial.print("\nAsyncWifimanager started on " + String(ARDUINO_BOARD) + "\n");

    //Initialize ESPAsyncWifimanager instance and assign Wi-Fi Client name "AsyncAutoConnect"!
    //This name and IP address can be checked from the router
    ESPAsync_WiFiManager ESPAsync_wifiManager(&webServer, &dnsServer, "Dual_Relay_Switch");

    //####### RESET SAVED WIFI SETTINGS #############
    //ESPAsync_wifiManager.resetSettings();   

    //ESPAsync_wifiManager.setAPStaticIPConfig(IPAddress(192, 168, 132, 1), IPAddress(192, 168, 132, 1), IPAddress(255, 255, 255, 0));
    //ESPAsync_wifiManager.autoConnect("Stonez_ESP32S", "AP-NAME", "AP-PASSWORD");
    
    ESPAsync_wifiManager.autoConnect("Dual_Switch_ESP32S");
    if (WiFi.status() == WL_CONNECTED)
    {
        Serial.print(DEVICE_NAME);
        Serial.print(" is on Local IP: ");
        Serial.println(WiFi.localIP());
    }
    else
    {
        Serial.println(ESPAsync_wifiManager.getStatus(WiFi.status()));
    }

    //Setup home page access content when visite
    home_page_message = "<!DOCTYPE html><html><head><title>" + DEVICE_NAME 
        + "</title></head><body><p><h2> Hi! This is " + DEVICE_NAME + "</h2>"
        + "To update firmware, <a href='/update'>Click here!!</a><br/><span>Username & Password required!</span></p><body></html>";

    webServer.on("/", HTTP_GET, [](AsyncWebServerRequest *request)
                 { request->send(200, "text/html", home_page_message); });

    //AsyncElegantOTA.begin(&webServer); // Start ElegantOTA WITHOUT username & password
    AsyncElegantOTA.begin(&webServer, FOTA_USERNAME, FOTA_PASSWORD); // Start ElegantOTA with username & password
    webServer.begin();
    Serial.println("AsyncElegantOTA server started @URL/update");

    //MQTT starts here!
    mqtt_client.setServer(mqtt_server, mqtt_port);
    mqtt_client.setCallback(callback);
}

/**
//When MQTT lost connection, this function will be called to reconnect MQTT//
 * Modified to accept multiple MQTT topics 
 * https://www.baldengineer.com/multiple-mqtt-topics-pubsubclient.html
 */
void callback(char *topic, byte *payload, unsigned int length)
{
    //Print message received
    Serial.print("Message arrived [");
    Serial.print(topic);
    Serial.print("] ");
    for (int i = 0; i < length; i++)
    {
        Serial.print((char)payload[i]);
    }
    Serial.println();

    //Process multiple topics here//
    payload[length] = '\0';
    String message = (char*)payload;
    
    if (strcmp(topic, "studio/humd_switch") == 0)
    {
      if(message == "true"){
        digitalWrite(RELAY_PIN_1, HIGH);
        Serial.println("humd_switch true");
      }
      if(message == "false"){
        digitalWrite(RELAY_PIN_1, LOW);
        Serial.println("humd_switch false");
      }
    }
    if (strcmp(topic, "studio/humd_switch2") == 0)
    {
      if(message == "true"){
        digitalWrite(RELAY_PIN_2, HIGH);
        Serial.println("humd_switch2 true");
      }
      if(message == "false"){
        digitalWrite(RELAY_PIN_2, LOW);
        Serial.println("humd_switch2 false");
      }
    }
}

//============= MQTT ===================
//When MQTT lost connection, this function will be called to reconnect MQTT//
void reconnect(){
    //Loop while MQTT connected
    while (!mqtt_client.connected())
    {
        Serial.print("Attempting MQTT connection... ");
        // Create a random client ID
        String clientId = "Stonez_ESP32Client-";
        clientId += String(random(0xffff), HEX);
        // Attempt to connect
        if (mqtt_client.connect(clientId.c_str()))
        {
            Serial.print("connected to ");
            Serial.print(mqtt_server);
            // Once connected, publish an announcement...
            mqtt_client.publish("outTopic", "Hello world");
            // ... and resubscribe
            mqtt_client.subscribe("studio/humd_switch");
            mqtt_client.subscribe("studio/humd_switch2");
        }
        else
        {
            Serial.print("failed, rc=");
            Serial.print(mqtt_client.state());
            Serial.println(" try again in 5 seconds");
            // Wait 5 seconds before retrying
            delay(5000);
        }
    }
}
void loop() {
    //============= MQTT ===================
    //if can't connect to MQTT server, then re-connect
    if (!mqtt_client.connected())
        { reconnect(); }
    //constantly check MQTT to see for messages sending/receiving
    mqtt_client.loop();

    /**
     * Write your own code here....
     * 
     */
}

Async_AutoConnect_ESP32_minimal.ino

/****************************************************************************************************************************
  Async_AutoConnect_ESP32_minimal.ino
  For ESP8266 / ESP32 boards
  Built by Khoi Hoang https://github.com/khoih-prog/ESPAsync_WiFiManager
  Licensed under MIT license
 *****************************************************************************************************************************/
#if !(defined(ESP32) )
  #error This code is intended to run on the ESP32 platform! Please check your Tools->Board setting.
#endif
#include <ESPAsync_WiFiManager.h>              //https://github.com/khoih-prog/ESPAsync_WiFiManager
AsyncWebServer webServer(80);
DNSServer dnsServer;

void setup()
{
  // put your setup code here, to run once:
  Serial.begin(115200); while (!Serial); delay(200);
  Serial.print("\nStarting Async_AutoConnect_ESP32_minimal on " + String(ARDUINO_BOARD)); Serial.println(ESP_ASYNC_WIFIMANAGER_VERSION);
  ESPAsync_WiFiManager ESPAsync_wifiManager(&webServer, &dnsServer, "AutoConnectAP");
  //ESPAsync_wifiManager.resetSettings();   //reset saved settings
  ESPAsync_wifiManager.setAPStaticIPConfig(IPAddress(192,168,132,1), IPAddress(192,168,132,1), IPAddress(255,255,255,0));
  ESPAsync_wifiManager.autoConnect("AutoConnectAP");
  if (WiFi.status() == WL_CONNECTED) { Serial.print(F("Connected. Local IP: ")); Serial.println(WiFi.localIP()); }
  else { Serial.println(ESPAsync_wifiManager.getStatus(WiFi.status())); }
}

void loop() {  }

Async_AutoConnect_ESP8266_minimal.ino

/****************************************************************************************************************************
  Async_AutoConnect_ESP8266_minimal.ino
  For ESP8266 / ESP32 boards
  Built by Khoi Hoang https://github.com/khoih-prog/ESPAsync_WiFiManager
  Licensed under MIT license
 *****************************************************************************************************************************/
#if !( defined(ESP8266) )
  #error This code is intended to run on ESP8266 platform! Please check your Tools->Board setting.
#endif
#include <ESPAsync_WiFiManager.h>              //https://github.com/khoih-prog/ESPAsync_WiFiManager
AsyncWebServer webServer(80);
DNSServer dnsServer;

void setup()
{
  // put your setup code here, to run once:
  Serial.begin(115200); while (!Serial); delay(200);
  Serial.print("\nStarting Async_AutoConnect_ESP8266_minimal on " + String(ARDUINO_BOARD)); Serial.println(ESP_ASYNC_WIFIMANAGER_VERSION);
  ESPAsync_WiFiManager ESPAsync_wifiManager(&webServer, &dnsServer, "AutoConnectAP");
  //ESPAsync_wifiManager.resetSettings();   //reset saved settings
  //ESPAsync_wifiManager.setAPStaticIPConfig(IPAddress(192,168,186,1), IPAddress(192,168,186,1), IPAddress(255,255,255,0));
  ESPAsync_wifiManager.autoConnect("AutoConnectAP");
  if (WiFi.status() == WL_CONNECTED) { Serial.print(F("Connected. Local IP: ")); Serial.println(WiFi.localIP()); }
  else { Serial.println(ESPAsync_wifiManager.getStatus(WiFi.status())); }
}

void loop() {  }


2022/07/09

一起來學樹莓派系列 - “如何使用 Log2RAM” 來增加SD卡的壽命, 及Pi運作的速度.

 大家好, 歡迎收看本週的weekend project with Stonez56. 

今天來和大家分享 “一起來學樹莓派” 系列 - “如何使用 Log2RAM” 來增加SD卡的壽命, 及Pi運作的速度. 


Log 主要是由系統上執行的一些程式在背景寫入到你的磁碟裡.  它可能是幾分鐘寫入一次, 或是幾秒鐘就寫入一次, 頻繁的讀寫 很容易造成SD卡的損毀並且影響運作的速度.


如果我們將 Log 直接寫入RAM, 就可以減少讀寫的次數, 提升Pi的運作速度, 及延長SD卡的壽命. 這些寫入到RAM的 Log 並不會消失, 它會每天再把這些 Log 寫回到SD卡. 所以你還是可以存取這些 Log的.  


使用 Log2RAM 也不是沒缺點, 如果你的 Pi 突然斷掉電源, 那麼你的 Log 就會完全消失了.

但仔細想想, 你上次查看 Log 是什麼時候呢? 如果不常使用 Log, 那麼這個 Log2RAM 就對你非常有幫助. 另外如果你的 Pi 的記憶體只有1GB或是512MB, 那可能就不合適來使用這個軟體的. 


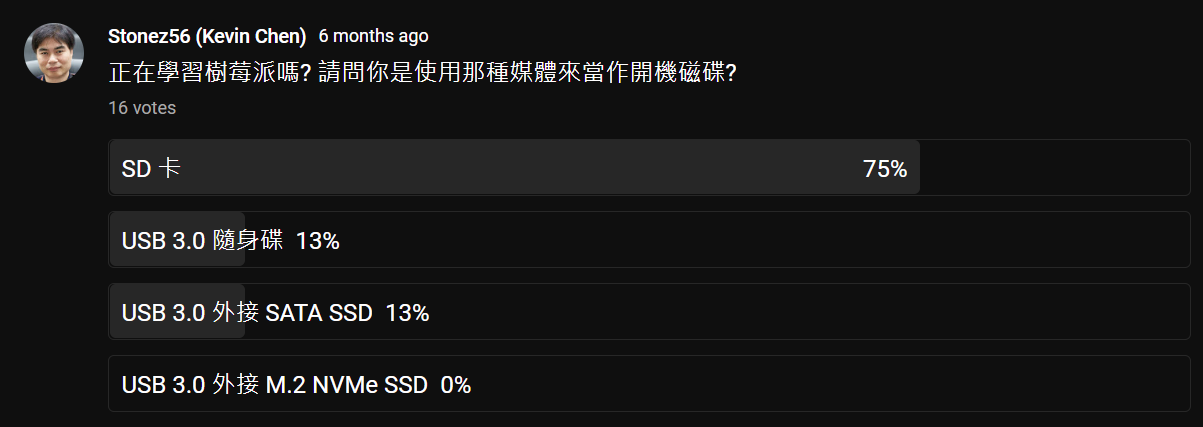
半年前我曾經做過一個簡單的線上調查, 看看各位使用樹莓派時, 用什麼儲存裝置.
調查的結果有75%的朋友都是使用SD卡. 那我們就開始今天的練習吧!

Step: 

  1. 更新你的 Pi

    • >sudo apt update

    • >sudo apt full-upgrade

  2. 安裝 rsync (用來同步兩地的資料)

    • >sudo apt install rsync

  3. 取得 Log2RAM

    • >wget https://github.com/azlux/log2ram/archive/master.tar.gz -O log2ram.tar.gz

  4. 使用 tar 來解壓縮

    • >tar xf log2ram.tar.gz

    • >cd /home/pi/log2ram-master

    • >sudo ./install.sh

  5. 先檢查system log 的大小

    • >sudo du -sh /var/log 41M

    • 先用3倍大小 = 120M

  6. 重新開機

    • >sudo reboot

  7. 檢查 log2ram 是否正常運作

    • systemctl status log2ram

  8. 如果想要檢查 log 怎麼辦呢? 把 log 寫回到 /var/log

    • >log2ram write

  9. 如果想要暫時停止或重新開始 log2RAM 怎麼辦呢?

    • >log2ram stop

    • >log2ram start


以後任何程式有寫入Log 到  /var/log, 就會被寫入到RAM裡面 


如何設定 Log2RAM

  1. 使用 Nano 來編輯設定檔 log2ram.conf

    • >sudo nano /etc/log2ram.conf

    • 找到 SIZE=40M, 看你係統的設定如果你的系統有產生很多少個話可以把設成120MB

    • PATH_DISK=”/var/log” 如果你還有其他的程式會時時寫入到SD, 可以在PATH_DISK後面加入分號, 再加入其它的路徑, 如: PATH_DISK=”/var/log; /var/mylog”

    • 儲存後並退出

    • 重新啟動樹莓派


想了解有哪些Log會寫入SD卡, 請到 /var/hdd.log/ 去看看有那些檔案被寫入.


2022/07/03

App Inventor #5 無線搖控 ESP32-CAM APP (Part 2)

 大家好, 歡迎收看本週的Weekend project with Stonez56。 本周要進行的是 App Inventor 第5集 - “無線搖控 ESP32-CAM APP Part 2”! 這個是一個專門為初學者來開發的一個系列, 所以會講的比較詳細, 相信各位只要仔細收看內容並進行實作, 一定會收獲滿滿滿。


因內容較多, 本影片分為上, 下兩集. 本集為 App Inventor程式設計. 

而上集為 UI 界面設計(https://youtu.be/x545mFSZWgg ),
如果你還沒有觀看的朋友, 請記得先去看一下, 再回來看這一集


再前一集是ESP32 程式的說明在這:
Arduino #35 使用 MQTT 無線搖控 ESP32-CAM 模組https://youtu.be/ECHBRdtV-yw 


好, 那我們就開始吧今天的練習吧~


2022/07/02

App Inventor #4 無線搖控 ESP32-CAM APP (Part 1)

 大家好, 歡迎收看本週的Weekend project with Stonez56。 本周要進行的是 App Inventor 第4集 - “無線搖控 ESP32-CAM APP Part 1”! 這個是一個專門為初學者來開發的一個系列, 所以會講的比較詳細, 相信各位只要仔細收看內容並進行實作, 一定會收獲滿滿滿。


因內容較多, 本影片分為上, 下兩集. 上集為 UI 界面設計, 下集為 App Inventor程式設計. 


上次為大家示範了如何使用HTML + CSS + Javascript來寫網頁程式(Arduino #35  https://youtu.be/ECHBRdtV-yw), 利用網頁版的MQTT來遠端搖控ESP32 , 收到了不錯的回響.

今天我們使用 App Inventor 2來開發遠端搖控的 APP來取代網頁版本. 在ESP32程式的撰寫不需做任何的改變, 因為只要 MQTT Topic 一樣, APP inventor 就可以發佈訊息到ESP32了! 超方便的!


App Inventor 使用 WebView 想串流影像時, 會出現: header fields are too long for the server to interpret. 這問題會在下集時, 跟各位說明. 


另外, 針對 ESP32 C++上的程式說明, 請看 Arduino #35  https://youtu.be/ECHBRdtV-yw


好, 那我們就開始吧今天的練習吧~