Showing posts with label IDE. Show all posts

2026/03/25

Gemini CLI 變天了!今天 (2026/3/25) 起有三大重大更新,免費用戶請注意 ⚠️

🚨 重點必看:Gemini Pro 轉為純付費制 從今天起,免費版用戶將無法再調用 Gemini Pro 模型,僅限使用 Gemini Flash

想繼續使用 Pro 或更高階模型,必須升級至 Pro 或 Ultra 方案💸

其他更新:

🔹 流量優先權調整:系統將依據授權等級分配流量。尖峰時段,免費版可能因容量限制而出現不穩定或延遲

🔹 嚴查濫用行為:加強偵測違反政策的第三方軟體掛載(如 oAuth 濫用)

各位是會準時課金,還是覺得 Flash 就夠用了?留言區告訴我 👇 


2021/06/20

VS Code - One of the best Arduino IDE


In recent years, Microsoft VS Code is considered the one of the best Arduino IDE!! 
I've made a video to show you how to use VS Code to write your Arduino codes, in Chinese only...

2015/04/26

A better Arduino IDE - Notepad++


VS Code is the best Arduino IDE Today!(2021-07)


Arduino IDE 1.6x has improved a lot over past few versions, such as adding line number, bug fixes, and many other features. However, Arudino IDE still has many miles to go to become a friendly editor for programmers. Syntax highlighting and programming language reference are programmer favorite features. However, they are not that fancy yet on the latest version of Arduino IDE V1.6.3.

I've been using Notepad++ (N++) for a while and Notepad++ is one of the most famous programming tools available for free!! Recently, I found josephdouce’s contribution on SourceForge that Joseph developed a N++ plugin for Arduino. Although it’s still in prealpha stage, it looks promising!

I would like to show you how to add N++ Arduino plugin into Notepad++ and use it as your editor.

Download Files:

  1. Download latest Notepad++ By Don Ho
    • You many select Installer, zip package, or 7z package
  2. Download latest Arduino IDE by Arduino.cc
    • Select Installer or zip package if you don't have admin access right
  3. Download N++ Arduino Plugin by josephdouce

Installation:

  1. Install Arduino by unzip the “Arduino-1.6.3-windows.zip” into your preferred folder or directly install it if you downloaded the Installer
  2. Install Notepad++ by unzip the download "npp.6.7.7.bin.zip" file into your preferred folder or directly install it if you downloaded the Installer
  3. Unzip N++ Arduino plugin zip files into an empty directory
Detailed N++ Arduino Plugin Settings:
  • First, let's import Arduino_Language_0.2.0.xml
    Start Notepadd++ application and click "Language", "Define your language..."
  • You should see "User Defined Language" window popup. Click on "Import..." and select the Arduino_Language_0.2.0.xml file  (This should be in the unzipped N++ Arduino plugin directory).  You will see import successfully message, then you may close this window.


  • Copy API files to Notepad++ plugins\APIs directory (This is where you installed the Notepad++).
    In my computer, it is in c:\Program Files\Notepad++\APIs\


  • In Notepad++, Click Preference


  • Click "Auto Completion" on the left (blue background) and then tick both "Enable auto-completion on each input" and "Function parameters hint on input", then close this window. (circled below)


How to use Arduino N++ Plugin:

When you start Notepad++ application, remember to click "Lanauages" then click on "Arduino". That's it! As you can see, as soon as you type, Notepad++ looks for variables or keywords from the XML file and show relevant candidates in a popup menu. As a programmer, it is a lot easier to just pick one up from the list. Isn't it?! ;)

Example:
A) I defined a variable called CheckStatus
B) As soon as I typed Check...
C) A list of suggested variable/command starting with letter C is listed in the box for you to pick up!

See below, Arduino language reference showing up automatically as you type!
This is really helpful!


Big thanks to these software contributors!!

How to invoke Arduino IDE for compiling and uploading to Arduino boards:
Quite few people was asking me if it's possible to compile code inside Notepad++. After few tries, I think it's impossible for now.  However, you may activate Arduino IDE inside Notepad++ with keystrokes you defined.

In Notepad++, Click "Run.."


You will see a popup window showed up. See illustration (A) below.
Click the 3 little dot button after the drop-down box and then select your Arduino executable file arduino.exe and then type "$(FULL_CURRENT_PATH)" right after the arduino.exe file. Double quotations are needed to make this work.

Here is mine for your reference:
"F:\arduino\arduino.exe" "$(FULL_CURRENT_PATH)"


Then Click "Save..." to assign a shortcut key. You will see another popup window(B). Tick the combination of CTRL, SHIFT, or ALT keys you like and pickup another key from the drop-down box. In my setup, I named it "Arduino" and selected CTRL + SHIFT + F5. From now on, I just need to hit the combination keys to invoke Arduino and bring the latest codes into Arduino IDE for compiling.

Hit CTRL + SHIFT + F5 you will see Arduino IDE invoking screen....


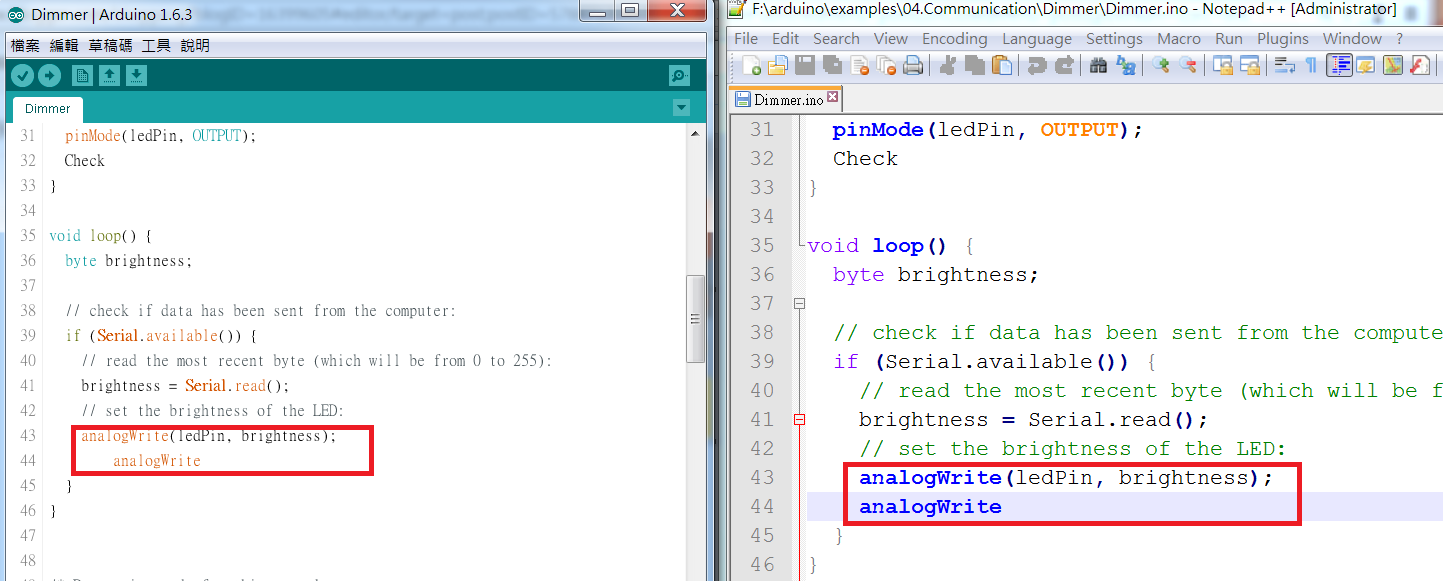
See below, codes in Notepad++ are identical as those in Arduino IDE.


PS: One problem though.... Each time you hit the combination keys, one instance of Arduino IDE will start and reside in the PC..... I don't have solution for this yet!

Thanks author Sriram Iyer for this tip: Using-notepad-plus-plus-instead-of-the-arduino-ide

End
================================================================

一套比 Arduino IDE 更好用的編輯器 - Notepad++ / Arduino N++ Plugin


Arduino 編輯器 V1.6x 雖然改進了不少,但是對寫程式的來說還是沒那麼好用。

Notepad++ 是一套很有名的文字編輯軟體。我自己曾使用 Notepad++ 寫 PHP,覺得它真的很好用。最近看到 SourceForge 上, 有位高手(josephdouce)寫了一套 N++ plugin for Arduino,雖然它只是 Prealpha 版本,但它已可以讓使用者在 Notepad++ 裡寫 Arduino,不但提供 Syntax highlight,變數及指令的提示, 也會給顯示語法使用方法及參數的提示,看來蠻有潛力的!

需下載的檔案:

  1. 由此下載最新版的 Notepad++ By Don Ho
    • 你可選擇要安裝版(Installer)或是壓縮檔(.zip or 7zip)再自行解壓縮也行
  2. 由此下載最新版的 Arduino IDE by Arduino.cc
    • 你可選擇要安裝版(Installer)或是壓縮檔(.zip or 7zip)再自行解壓縮也行
  3. 由此下載  N++ Arduino Plugin by josephdouce

安裝方法:

  1. Arduino: 選擇壓縮檔者,只要把 “Arduino-1.6.3-windows.zip” 解壓縮到你想要執行的目錄即可。 選擇安裝檔者,就按步驟執行即可。
  2. Notepad++: 選擇壓縮檔者,只要把 “npp.6.7.7.bin.zip” 解壓縮到你想要執行的目錄即可。 選擇安裝檔者,就按步驟執行即可。
  3. N++ Arduino plugin: 解壓縮 "Notepad++.Arduino.0.2.0.zip" 到自己想放的目錄即可。
N++ Arduino Plugin 安裝與設定:
  • 匯入 Arduino_Language_0.2.0.xml 設定檔
    開啟 Notepadd++ 然後點選 "Language/程式語言", "Define your language.../定義程式語言" 如下圖:
  • "User Defined Language/自訂程式語言" 視窗會跳出來。點選 "Import.../匯入"(見下圖) 然後由視窗裡點選 Arduino_Language_0.2.0.xml 檔案。 (這個檔案就是你剛剛解壓縮N++ Arduino plugin的目錄)。  如果匯入完成,你會看到完成的提示視窗。


  • 從N++ Arduino plugin解壓的目錄裡,把 API  "Arduinolbs" 目錄夾 整個 copy 到 Notepad++ plugins\API 目錄底下 ( Notepad++ 執行檔安裝位置裡有一個 \plugins\APIs 的目錄)  在我自己的電腦,Notepad++ 是安裝在 c:\Program Files\Notepad++\APIs\ 底下


  • 在回到 Notepad++, 點選 "Preference/自訂"


  • 從左邊點選 "Auto Completion/自動完成功能"  然後把 "Enable auto-completion on each input/啟動自動完成功能" 和 "Function parameters hint on input/自動顯示功能參數提示", 打勾 ,關掉視窗即設定完成。 參考下圖:

Arduino N++ plugin for Notepad++ 使用方法:

只要安裝成功,使用方法非常簡單! 打開 Notepad++, 在程式語言的清單裡選擇 Arduino 即可!
往後只要你一邊打字, N++ plugin 會把相關的指令或是你使用過的變數在一 個小視窗上列出來。這樣一來,你可以挑想用的變數或是指令, 降低變數/指令使用出錯率。

例如:
A) 我定義了 CheckStatus 變數
B) 只要我在 Notepad++ 裡打了 Check
C) 所有指令或是變數是由 C 開頭的都會顯示在小視窗裡,CheckStatus 就在最底下,如下圖:

Arduino 指令使用方法及參數也會自動顯示出來了! 對新手來說, 這樣可以減少查閱指令的使用方法,是不是太方便了!


如何在 Notepad++ 裡呼叫 Arduino IDE 來編譯及上傳到Arduino上:

有不少人問我,能不能在Notepad++ 裡直接呼叫 Arduino IDE 來編譯及上傳。找了網上的一些資料,發現目前還沒有方法可以做的到。不過,你可以自行定義快速鍵來呼叫 Arduino IDE 並且把正在編輯的程式碼直接傳到 Arduino IDE 裡。

在 Notepad++ 裡, 點選 "Run.."


你會看到一個 Run... 的視窗跳出來如下圖(A)
點一下有3個小點的鈕,然後選取你的 Arduino 的執行檔,再加上左右側的雙引號在路徑的前後,空一格,再加上 "$(FULL_CURRENT_PATH)" 

在我的PC上,它看起來應該像這樣:( 引號有四個,都要打上去才行)
"F:\arduino\arduino.exe" "$(FULL_CURRENT_PATH)"


按下 "Save.../存檔" 然後你會看到視窗(B) 自行定義快速鍵,把你想要指定的快速鍵打勾,再從下拉選單裡,選一個自己喜歡的組合,然後在 Name: 那裡自己取一個檔名來儲存。我自己取為 Arduino 並選取了 CTRL + SHIFT + F5. 按 OK, 關掉視窗。

往後我只要按下  CTRL + SHIFT + F5 在 Notepad++ 裡,即可直接呼叫 Arduino IDE 來編譯及上傳。


按下CTRL + SHIFT + F5 鈕後,會看到這個畫面表示 Arduino IDE 開始啟動:


右側視窗的 Notepad++ 呼叫 Arduino IDE, 你可以看到左側是 Arduino IDE 裡的程式碼和右側
Notepad++ 裡的程式已經同步。


PS: 有一點小小的問題.... 每次你呼叫一次 Arduino IDE,它的程式就會長註一個在電腦裡。我還不知道有沒有解法!

謝謝網友 Sriram Iyer 網誌裡提供在 Notepad++ 裡呼叫 Arduion IDE 的方法: Using-notepad-plus-plus-instead-of-the-arduino-ide


結束


2014/01/15

Change font type and size for Arduino IDE

When I started Arduino IDE the first time, I couldn't believe the default font size is so blurry and small. I finally found a way to change the default fonts and make the fonts more clearly.
Let's change the font size and type in this tutorial.

As you can see below, the default fonts is so blurry Arduino IDE:


First, go to the menu "File"-> "Preferences". You may setup the font size you prefer. I prefered size 18. (See red square with 18 in it. That's my prefered font size.) Then at the bottom of the preference box, there is the path to the file preferences.txt  (see image below)


We need use a text editor to change preferences.txt's content to make font clear.


Use a text editor to open the preferences.txt file in the path shown above. After the file is opened, find "editor.antialias=false" and change false to true. If you want to, you may also change the font size directly in the editor. (See read mark below).

** Don't forget to save the file and restart Arduino IDE for these changes to work.


After restart Arduino IDE, you will see the fonts are much clear and bigger than before!


Thank you!
---------------END----------------------

改變 Arduino 編輯器字型讓它更容易編寫程式


一開始使用 Arduino 時,不知道你是不是和我一樣,覺得Arduino  編輯器的內定字型實在是太不清楚了!今天來改變它的內定字型吧!

Arduino 編輯器模糊又不清楚的字如下:


先到檔案->打開設定 畫面如下, 先設定你要的字型大小(在紅框位置,我設定18)
再看清楚它設定檔 preferences.txt 的位置,這個 preferences.txt  我們稍候需要用編輯器來變更它的內容,以便讓字變的更清楚。


使用文字編輯工具,我用的是 pico,依先上面顯示的位置,開啟 preferences.txt。在其檔案內容中找到 editor.antialias=false這一行,然後把 false 改成 true 再存檔起來。你也可以在這裡直接改變不同字型或是大小,如底下紅框所示。存檔後,要記得關掉 Arduino 編輯器再重新開啟,這些改變才會生效。


重新開啟 Arduino 編輯器,你看,字型是否清楚多了!


v


2014/01/12

Another Arduino Editor - Sublime 2 Text for Mac

P.S: This tutorial was written back in 2014 and here is the English version.

I just started to learn Arduino and found out its IDE is not best one available; the fonts are not clear and quite small, no line numbers(V1.6 has line number now, Ya!!), and no being able to refer to variables during coding and no auto-complete funcationality.

After few search⋯⋯I found Sublime 2 + Stino plugin

If you are using a Mac and you do not like Arduino IDE, then you should give this editor a try:
 Sublime 2 + Stino plugin

Installation:
  1. Download and install  Sublime 2 Text from here http://www.sublimetext.com/2
  2. Download latest Stino plugin:https://github.com/Robot-Will/Stino Just checked, the latest plugin was released in July-2015  
  3. Start  Sublime 2 Text application
  4. Select [Preference] -> [Browse Packages...]
  5. Uncompress "new-stino.zip" and place unzipped file into "packages" folder
  6. Close Sublime 2 Text application
  7. Re-start Sublime 2 Text application
  8. Setup type of your Arduino board by Select [Arduino] -> [Board]: The Arduino board I am using is Arduino Mini Pro, so I just select Arduino Mini Pro
  9. Setting the Serial Port by select [Arduino] -> [Board] -> [Serial Port]:In my case my serial port is located at  /dev/tty.usbserial-FTX1JDSJ
  10. Done.
Now you can try to open Arduino sample Blink for Sublime text to compile. Select [Arduino]-> [Samples]-> [01. Baisc]  -> [Blink()] , then try to  [Compile] / [Upload]. If you couldn't successfully compile or upload, there must be some steps missing or something wrong. Try to repeat the installation process again.


Below screenshot is from Sublime 2 Text Editor and as you can see it looks much better as well as it provide auto-complete and finding the variables you use in your projects.  Now, give it a try!

P.S: After installation, you must select the correct type of Arduino board AND correct Serial Port or the compile will fail!!


Enjoy it!
=====================================

Arduino 好用編輯器 Sublime 2 Text for Macbook 


最近在學 Arduino 發現它的編輯器實在是字體不清楚,又難用。

所以⋯⋯我找到了 Sublime 2 + Stino plugin  。

若你是使用Mac的人,覺得 Arduino 的編輯器不好看也不好用的的人可以試試
 Sublime 2 + Stino plugin

安裝方法:(上次沒寫安裝方法,連我自己都忘了!)
  1. 下載並安裝 Sublime 2 Text http://www.sublimetext.com/2
  2. 下載 Stino plugin:https://github.com/Robot-Will/Stino 剛剛看的,最新版在2015年7月更新的。
    經常看一下Stino 網址,看它有沒有更新:  https://github.com/Robot-Will/Stino
  3. 開啟 Sublime 2 Text
  4. 選擇 Preference -> Browse Packages...
  5. 把 new-stino.zip 解壓縮後,放到 packages 的資料夾內
  6. 關閉 Sublime 2 Text
  7. 重新開啟 Sublime 2 Text
  8. 設定你的 Arduino 板子, 選擇 Arduino -> Board: 我的板子是 Arduino mini Pro 
  9. 設定 Serial Port, 選擇 Arduino -> Board -> Serial Port:我的是 /dev/tty.usbserial-FTX1JDSJ
  10. 完成
你可以試著從 Arduino-> Samples-> 01. Baisc  -> Blink() 打開, 並試著 Compile / Upload, 若無法成功執行,表示你的設定過程序有問題...再試試上面步驟看看!


Sublime 2 Text 的編輯器長的像底下這樣, 好看多了...
而且它有自動完成,自動找出變數等許多種好用的功能,快試試吧!

P.S: 安裝完後,一定要選對你使用的 Arudino 板子,不然會 compile error!
像我是用 Arduino mini pro Atmeg32 5V 32bit的