2022/06/18

Android #35 使用 MQTT 無線搖控 ESP32-CAM 模組

 大家好, 歡迎收看本週的Weekend project with Stonez56。

本周要進行的是 Arduino 第35集,"使用 MQTT 無線搖控 ESP32-CAM 模組”。這個是一個專門為初學者來開發的一個系列, 所以會講的比較詳細, 相信各位只要仔細收看內容並進行實作, 一定會收獲滿滿滿。好, 那我們就開始吧今天的練習吧~


!!! ESP32-CAM streaming 的程式是由這裡取得:
https://github.com/wjsanek/wjsanek/blob/main/Working_ESP32_CameraWebServer_V2_with_OTA.zip

 這位高手把一大堆沒有用到的ESP32-CAM的程式移除, 所以我才有機會把程式寫成可以OTA.


在 VScode 裡, ESP32-CAM 的模組, 設定如下:

Board: ESP32 Wrover Module

  • Upload Speed: 115200

  • Flash Frequency: 80MHz

  • Flash Mode: QIO

  • Partition Scheme: Minimal SPIFFS (1.9MB APP with OTA/190KB SPIFFS)


本次學習的目標是能遠端遙控 ESP32-CAM, 所以會用到下列的程式

  • ESP32-CAM - Camera 伺服器 串流影像

  • Servo - 控制 SG90 伺服器擺動

  • ESPAsyncWifimanager - 隨時改變 Wi-Fi 設定

  • AsyncElegantOTA - FOTA - 隨時隨地的更新 firmware

  • MQTT - PubSubClient - 由ESP32-CAM 收送訊息

  • Paho MQTT Javascript client - 由瀏覽器 收送訊息 / HTML 編寫


本專案會用到下列的電子元件:


  • ESP32-CAM * 1

  • 天線 * 1

  • SG90 Servo 伺服器 * 2 - 上下 & 左右擺動各一個

  • 1000uf 電容一顆 * 1 - 過濾影像的水波紋

  • 杜邦線 * 4 - Power, GND, IO12, IO13


參考資料:


2022/05/22

ESP32-CAM module not stable, black screen, disconnect all the time? (模組 影像串流一直斷線不穩 - 先檢查電阻)

I have bought two ESP32-CAM modules and doing a weekend project. However, the video streaming from these two ESP-32CAM modules are not stable and just constantly disconnect and get black screens after few minutes or even few seconds. It's quite annoying.  After search and search, I found this article...

https://randomnerdtutorials.com/esp32-cam-connect-external-antenna/

If you have encountered similar issues on your ESP32-CAM modules, remember to check the location of the resistors.

Left: External antenna resistor location

Right: Internal antenna resistor location

Photo from the refereed website above. Thanks!


Thanks for the vendor who sold me these two ESP32-CAM modules that put on these external antenna resistors for me....but at least tell me in advance.   I was debug here and there for few days until I found out why! ha..  😅


===中文版====

我買了2 個ESP32-CAM 模組, 搞不定影像串流一直斷線不穩定….直到看到這一篇!  找了外接天線來裝上後, 穩定多了, 不再斷線黑畫面. 

如果你也遇到同樣的問題, 記得先檢查 ESP32-CAM 上的天線電阻位置. 

https://randomnerdtutorials.com/esp32-cam-connect-external-antenna/

左側圖: 外接天線電阻
右側圖: 內接天線電阻


但這老闆也太好心了, 給我的 2個模組都焊上了外接天線電阻...也沒有告訴我,  於是我一直 debug … debug … 再debug 就這樣花了好久時間~~ 😅


2022/05/09

App Inventor #2 “自己來寫mqtt APP Android & iOS都能用” (Create MQTT Apps with App Inventor 2)

本週我要進行教授的課程是 App Inventor 第二集。  “自己來寫mqtt APP Android & iOS都能用”.

這個影片適合初學者來觀看學習, 想拿來這個單元來學習 App Inventor 2 也是很 Ok 的! 

~~ 更新 2023-01-15~~~~~~~~~~~~~~~~~~~~~~~~~

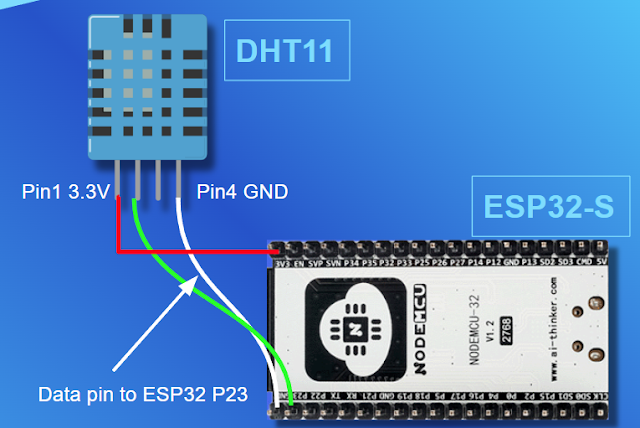
有少數朋友來詢問, 這個範例要怎麼連線, 所以我把 ESP32 + DH11 的連線方式寫在此分享:


~~~~~~~~~~~~~~~~~~~~~~~~~~~~~~~~~~~~~~~~~


上次為大家介紹了 Android MQTT App - MQTTDash, 但是苦於沒有免費好用的 iOS MQTT Client, 那就用 App Inventor 2 來自己寫吧~  據 App Inventor 2 官網資料, 它可以同步開發 Android & iOS App! 但是我沒有使用 iOS 手機, 有成功的朋友再來和大家回報一下, 謝謝! 


觀看本集後, 那要如何在 ESP32 上如何自己寫程式呢?

請看: Arduino #32 用一塊ESP32來學 IOT: 

https://www.youtube.com/watch?v=x3k_dZXua1I 


本影片用到的程式碼:

https://stonez56.blogspot.com/2022/04/android-34-esp32iot-android-learn-iot.html 


影片中有錯字更正, 不然收不到溫溼度喔~~

Typo here...

13:32 影片中口誤把 RWD (Responsive Web Design) 說成 RDW 

33:49 Correction: stonez56/esp32s_temp  

34:05 Correction: stonez56/esp32s_humd 

35:27 Correction: stonez56/esp32s_temp  

46:49 Correction: stonez56/esp32s_humd


App Inventor 程式碼提供在此, 以方便偵錯使用!


參考資料:

MIT App Inventor: https://appinventor.mit.edu/ 

MQTT extension: https://ullisroboterseite.de/android-AI2-PahoMQTT-en.html 

MQTT extension download: https://ullisroboterseite.de/android-AI2-PahoDown.html 

Apple store download: https://apps.apple.com/tw/app/mit-app-inventor/id1422709355 


如果時間不夠的朋友, 也可以從以下的時間軸挑選想看的部份即可!


影片時間軸:

00:00 Start

01:01 先到 MIT App Inventor 網站

01:50 導入 MQTT extension (外掛)

04:26 上傳App 所需要用的圖片

05:23 設置 Screen1

07:07 啟用可滾動樣式 - 可更容易排列元件

08:43 如何佈局螢幕

12:47 設置燈泡圖片

14:04 RWD設計, 元件皆以百分比來設定!

17:20 在標籤上顯示溫度/濕度

21:52 設置 MQTT 連接按鈕

24:56 將圖片設計成按鈕; 稍候方可點選!

25:26 設置 MQTT Extension (外掛)

27:31 點擊“Blocks”開始寫程式

30:10 MQTT連線狀態變更的設定

35:53 發布主題並打開/關閉燈泡

43:23 處理接收所訂閱的 topics

47:34 為 Android 生成 .apk 執行檔

49:30 如何在Apple 手機運行程式? (未實作! 慎入) 

App Inventor #3 “自己來寫APP 快篩何處買?” (How to process .csv files in App Inventor)

~~更新~~

有網友留言, 兩個Global變數 "search_city" & "search_area" 沒有在影片中定義~ 

剛剛把影片調出來看, 這兩個Global變數 "search_city" & "search_area" 的確沒有在影片中出現!  這兩周剪接這影片時, 可能被我不小心剪掉了, 請各位朋友自行加入這兩個變數. 謝謝darbertchang 提醒~ 

加入的方法可以參考這裡的作法喔: https://youtu.be/cEN9jAxf2VU

~~~~


App Inventor #3

大家好, 歡迎收看本週的Weekend project with Stonez56. 


 本週我要進行教授的課程是 App Inventor 第3集。  “App Inventor #3  “自己來寫APP 快篩何處買?” (How to process .csv files in App Inventor 2)”.  這個影片適合初學者來觀看學習, 想拿來這個單元來學習 App Inventor 2 也是很 Ok 的! 


這幾天最熱門的話題就是快篩試劑何處買了! 到處都大排長龍, 有找了許多點也找不到~ 本集的 App Inventor #3 我們一起來做一隻 App 以縣市, 鄉鎮區來查詢什麼地方才能買到.


這支App 主要是處理 .CSV 檔案來呈現 App 的資訊. 而這個資料是由政府資料開放平臺的- 配合辦理發放公費COVID-19家用快篩試劑社區定點診所名單 頁面下載的資料而來, 資料更新時間為 2022-04-26 20:16 算是很即時的資料~~ 不準不能怪我 Stonez56~~ (2022-5-6 17:09 又釋出新版資料, 格式不變, 一樣能用, 同學們記得下載新版來用)


我採用下載 .CSV 檔案後, 上傳到 App 裡, 再處理 .CSV. 我們也可以直接即時下載 .CSV 來得最新即時的資料, 但是我觀察了幾天, 資料變化不快, 不需要每執行一次, 就去下載一次 .CSV 快浪費時間, 也浪費頻寬~ 


一起動手來寫 APP 吧~ 


如果時間不夠的朋友, 也可以從以下的時間軸挑選想看的部份即可!


影片時間軸:

00:00:00 開始

00:00:28 了解這次開發程式的功能

00:01:38 從政府開放資料平台獲取資料(.CSV)

00:02:18 使用 OpenStreetMap, 拾棄 Google Map

00:02:51 了解 .CSV 文件格式

00:04:25 設計 App 使用者界面

00:16:59 準備開始來寫 APP

00:36:34 介紹AI2 Companion App

00:40:39 如何建立並使用副程式(Procedure)

00:56:42 使用 ListUtils 擴展刪除重複項

01:09:29 如何分割/結合字串

01:25:40 使用副程式(Procedure)的好處

01:27:11 加入 OpenStreetMap 地圖畫面

01:28:09 設計 MapScreen 使用者介面

01:33:59 開始設計 MapScreen 程式

01:47:06 秘密挑戰~~ ;)

圖檔下載:


rapid-test-icon.png


rapid-test-big.png

AI2 程式碼 (Screen 1):

變數定義 (Define Global variables)

產生查詢結果到 list view (Generate display item list)

Screen1 Initialize & process after read .csv file

After picking of city & area / populate specific city & unique area


AI2 程式碼 (MapScreen):

顯示結果在 OpenStreetMap 上 (Show results on the map)


參考資料:

* 如何處理 .csv: https://www.youtube.com/watch?v=K2n98PYO90M 

* TextUtils extension: https://community.appinventor.mit.edu/t/all-rescued-extensions-from-appybuilder-community/27169/47?page=3 

 * 配合辦理發放公費COVID-19家用快篩試劑社區定點診所名稱、地址、座標

https://data.gov.tw/dataset/150692 

* Google Map 取得 Marker 要輸入信用卡資料了: 

https://developers.google.com/maps/documentation/maps-static/overview 

* APP 地圖使用: App Inventor 內建之 OpenStreet Map: https://www.openstreetmap.org/#map=8/23.611/120.768  

2022/04/23

Android #34 用一塊ESP32來學IOT - Android手機也能通 (Learn IOT with an ESP32 / remote control w/ MQTTDash)

Android #34 用一塊ESP32來學IOT - Android手機也能通 Learn IOT with an ESP32 / remote control w/ MQTTDash

** ENGLISH closed captions is now available for this video ** Learn IOT with an ESP32 / remote control w/ MQTTDash APP

Video timeline:

00:58 Download MQTTDash App 01:29 Create an MQTT connection 03:20 Dashboard Design 04:17 Review subscriptions on MQTTLens 05:15 Enter subscription topics in MQTTDash 10:30 See the Demo on the phone 12:39 Modify ESP32 code accordingly 大家好, 歡迎收看本週的Weekend project with Stonez56。 本周是Android 第34集,"用一塊ESP32來學IOT - Android 手機也能通”。這個是一個專門為初學者來開發的一個系列。 繼上集之後, 有網友反應無法在手機上用 MQTTlens. 所以我們今天要把只能在電腦上使用的 MQTTLens 改成 MQTTDash 這支Android APP. 這樣子, 只要帶著手機, 我們就可真正隨時隨地的遠端控制IOT設備了~ 那我們就一起來學習吧。 Android MQTTDash App: https://play.google.com/store/apps/details?id=net.routix.mqttdash&hl=zh_TW&gl=US&showAllReviews=true 尚未看過這系列的朋友, 建議從這裡依序學習: * 用一塊ESP32來學 IOT https://youtu.be/rjPU4YZG338 * 溫溼度篇 https://youtu.be/x3k_dZXua1I * Android App 也能通 https://youtu.be/0IjQOxD2j48 如果時間不夠的朋友, 也可以從以下的時間軸挑選想看的部份即可! 影片時間軸: 00:00 開始 00:58 下載 MQTTDash APP 01:29 建立 EMQX MQTT 連線 03:20 儀表板設計 04:17 查看之前 MQTTLens 上的訂閱/發佈主題 05:15 在 MQTTDash 中加入訂閱/發佈主題 10:30 看實際手機+ESP32 展示 12:39 如何修改 ESP32 相應代碼

Source code:

/*
 Basic ESP8266 MQTT example
 This sketch demonstrates the capabilities of the pubsub library in combination
 with the ESP8266 board/library.
 It connects to an MQTT server then:
  - publishes "hello world" to the topic "outTopic" every two seconds
  - subscribes to the topic "inTopic", printing out any messages
    it receives. NB - it assumes the received payloads are strings not binary
  - If the first character of the topic "inTopic" is an 1, switch ON the ESP Led,
    else switch it off
 It will reconnect to the server if the connection is lost using a blocking
 reconnect function. See the 'mqtt_reconnect_nonblocking' example for how to
 achieve the same result without blocking the main loop.
 To install the ESP8266 board, (using Arduino 1.6.4+):
  - Add the following 3rd party board manager under "File -> Preferences -> Additional Boards Manager URLs":
       http://arduino.esp8266.com/stable/package_esp8266com_index.json
  - Open the "Tools -> Board -> Board Manager" and click install for the ESP8266"
  - Select your ESP8266 in "Tools -> Board"
*/

#include <WiFi.h>
#include <PubSubClient.h>
#include <EasyButton.h>
#define LED 2        //built-in LED on ESP32

#include "DHT.h"
#define DHTPIN 23     // Digital pin connected to the DHT sensor
#define DHTTYPE DHT11 // DHT11
DHT dht(DHTPIN, DHTTYPE); // Initialize DHT sensor.
// Set up the temp / humidity update cycle
const int updateCycle = 5000;

// Update these with values suitable for your network.
const char *ssid = "Wi-Fi SSID";
const char *password = "Wi-Fi Password";

// Define your client ID on EMQX
String mqtt_ClientID = "stonez56_IOT_Station_";

// Define your topics to subscribe / publish
const char* sub_topic = "stonez56/esp32s";
const char* pub_led_topic = "stonez56/esp32s_led_state";
const char* pub_init_topic = "stonez56/esp32s_is_back";
const char* pub_temp_topic = "stonez56/esp32s_temp";
const char* pub_humd_topic = "stonez56/esp32s_humd";

// EMQX broker parameters
const char *mqtt_server = "broker.emqx.io";
const char *mqtt_userName = "emqx";
const char *mqtt_password = "public";

WiFiClient espClient;
PubSubClient client(espClient);
unsigned long lastMsg = 0;
#define MSG_BUFFER_SIZE (50)
char msg[MSG_BUFFER_SIZE];
char msg1[MSG_BUFFER_SIZE];

int value = 0;

void setup_wifi()
{
    delay(10);
    // We start by connecting to a WiFi network
    Serial.println();
    Serial.print("Connecting to ");
    Serial.println(ssid);

    WiFi.mode(WIFI_STA);
    WiFi.begin(ssid, password);

    while (WiFi.status() != WL_CONNECTED)
    {
        delay(500);
        Serial.print(".");
    }

    randomSeed(micros());

    Serial.println("");
    Serial.println("WiFi connected");
    Serial.println("IP address: ");
    Serial.println(WiFi.localIP());
}

void callback(char *topic, byte *payload, unsigned int length)
{
    Serial.print("Message arrived [");
    Serial.print(topic);
    Serial.print("] ");
    for (int i = 0; i < length; i++)
    {
        Serial.print((char)payload[i]);
    }
    Serial.println();

    payload[length] = '\0';
    String message = (char *)payload;
    
    if (strcmp(topic, sub_topic) == 0)
    {
        if (message == "off")
        {
            digitalWrite(LED, LOW); //Turn off
            client.publish(pub_led_topic, "off");
        }
        if (message == "on")
        {
            digitalWrite(LED, HIGH); //Turn on
            client.publish(pub_led_topic, "on");
        }
    }

    /* Switch on the LED if an 1 was received as first character
    // if ((char)payload[0] == '1')
    // {
    //     digitalWrite(BUILTIN_LED, LOW); // Turn the LED on (Note that LOW is the voltage level
    //                                     // but actually the LED is on; this is because
    //                                     // it is active low on the ESP-01)
    // }
    // else
    // {
    //     digitalWrite(BUILTIN_LED, HIGH); // Turn the LED off by making the voltage HIGH
    // } */
}

void reconnect()
{
    // Loop until we're reconnected
    while (!client.connected())
    {

        Serial.println("Attempting EMQX MQTT connection...");
        // Create a random client ID
        mqtt_ClientID += String(random(0xffff), HEX);
        // Attempt to connect
        if (client.connect((mqtt_ClientID, mqtt_userName, mqtt_password)))
        {
            Serial.print(" connected with Client ID: ");
            Serial.println(mqtt_ClientID);
            // Once connected, publish an announcement...
            client.publish(pub_init_topic, "Hi, I'm online!");
            // ... and resubscribe
            client.subscribe(sub_topic);
        }
        else
        {
            Serial.print("failed, rc=");
            Serial.print(client.state());
            Serial.println(" try again in 5 seconds");
            // Wait 5 seconds before retrying
            delay(5000);
        }
    }
}

void setup()
{
    //Start DH11 sensor
    dht.begin();

    pinMode(LED, OUTPUT); // Initialize the _LED pin as an output
    digitalWrite(LED, LOW); //default ESP32 LOW is turn off

    Serial.begin(115200);
    setup_wifi();
    client.setServer(mqtt_server, 1883);
    client.setCallback(callback);
}

void loop()
{

    if (!client.connected())
    {
        reconnect();
    }
    client.loop();

    unsigned long now = millis();
    if (now - lastMsg > updateCycle)
    {
        lastMsg = now;
        float humidity = dht.readHumidity();
        float temperature = dht.readTemperature();
        // Check if any reads failed and exit early (to try again).
        if (isnan(humidity) || isnan(temperature))
        {
            Serial.println(F("Failed to read from DHT sensor!"));
            return;
        }else{ // publish the message
            snprintf(msg, MSG_BUFFER_SIZE, "%.1lf°", temperature);
            snprintf(msg1, MSG_BUFFER_SIZE,"%.0lf%%", humidity);
            Serial.print("Publish message: ");
            Serial.println(msg);
            client.publish(pub_temp_topic, msg);
            client.publish(pub_humd_topic, msg1);
            
        }

    }
}

;

2022/03/27

Arduino #32 用一塊ESP32來學 IOT (#32 Learn IOT with MQTT + ESP32)

大家好, 今天和大家來分享, Arduino #32 用一塊ESP32來學 IOT (#32 Learn IOT with MQTT + ESP32) 這個影片很適合初學者來觀看學習. 影片內容主要是告訴大家, 只要手上有一塊 ESP32 和一台電腦, 就可以開始學習 IOT 了 ! 看過這個影片, 你會了解學習 IOT 一點都不難喔! 甚至可以延伸作法, 利用 MQTTlens 透過雲端EMQX來做遠端的控制!


參考資料:

如果時間不夠的朋友, 也可以從以下的時間軸挑選想看的部份即可!

影片時間軸:

  • 00:00 開始
  • 00:29 什麼是 MQTT,它是如何運作的?
  • 01:30 你的第一個IOT專案!
  • 01:55 MQTT 程式:pubsubclient
  • 02:40 Arduino IDE: 設定Additional Boards Manager URL
  • 03:09 Arduino IDE 其它設定
  • 03:48 從我的部落格中下載程式並貼在Arduino IDE
  • 04:07 在程式中更改必要的設定
  • 07:27 從 Chrome 瀏覽器啟動 MQTTlens
  • 07:54 在 MQTTlens 新增 EMQX 連線
  • 09:54 訂閱 ESP32上的兩個主題
  • 11:19 從 MQTTlens 發布主題
  • 12:45 本次主要內容摘要

程式碼:


/*
 Basic ESP8266 MQTT example
 This sketch demonstrates the capabilities of the pubsub library in combination
 with the ESP8266 board/library.
 It connects to an MQTT server then:
  - publishes "hello world" to the topic "outTopic" every two seconds
  - subscribes to the topic "inTopic", printing out any messages
    it receives. NB - it assumes the received payloads are strings not binary
  - If the first character of the topic "inTopic" is an 1, switch ON the ESP Led,
    else switch it off
 It will reconnect to the server if the connection is lost using a blocking
 reconnect function. See the 'mqtt_reconnect_nonblocking' example for how to
 achieve the same result without blocking the main loop.
 To install the ESP8266 board, (using Arduino 1.6.4+):
  - Add the following 3rd party board manager under "File -> Preferences -> Additional Boards Manager URLs":
       http://arduino.esp8266.com/stable/package_esp8266com_index.json
  - Open the "Tools -> Board -> Board Manager" and click install for the ESP8266"
  - Select your ESP8266 in "Tools -> Board"
*/

#include <WiFi.h>
#include <PubSubClient.h>
#include <EasyButton.h>
#define LED 2        //built-in LED on ESP32

// Update these with values suitable for your network.
const char *ssid = "WiFi-SSID";
const char *password = "WiFi-PASSWORD";

// Define your client ID on EMQX
String mqtt_ClientID = "stonez56_IOT_Station_";

// Define your topics to subscribe / publish
const char* sub_topic = "stonez56/esp32s";
const char* pub_led_topic = "stonez56/esp32s_led_state";
const char* pub_init_topic = "stonez56/esp32s_is_back";

// EMQX broker parameters
const char *mqtt_server = "broker.emqx.io";
const char *mqtt_userName = "emqx";
const char *mqtt_password = "public";

WiFiClient espClient;
PubSubClient client(espClient);
unsigned long lastMsg = 0;
#define MSG_BUFFER_SIZE (50)
char msg[MSG_BUFFER_SIZE];
int value = 0;

void setup_wifi()
{
    delay(10);
    // We start by connecting to a WiFi network
    Serial.println();
    Serial.print("Connecting to ");
    Serial.println(ssid);

    WiFi.mode(WIFI_STA);
    WiFi.begin(ssid, password);

    while (WiFi.status() != WL_CONNECTED)
    {
        delay(500);
        Serial.print(".");
    }

    randomSeed(micros());

    Serial.println("");
    Serial.println("WiFi connected");
    Serial.println("IP address: ");
    Serial.println(WiFi.localIP());
}

void callback(char *topic, byte *payload, unsigned int length)
{
    Serial.print("Message arrived [");
    Serial.print(topic);
    Serial.print("] ");
    for (int i = 0; i < length; i++)
    {
        Serial.print((char)payload[i]);
    }
    Serial.println();

    payload[length] = '\0';
    String message = (char *)payload;
    
    if (strcmp(topic, sub_topic) == 0)
    {
        if (message == "off")
        {
            digitalWrite(LED, LOW); //Turn off
            client.publish(pub_led_topic, "off");
        }
        if (message == "on")
        {
            digitalWrite(LED, HIGH); //Turn on
            client.publish(pub_led_topic, "on");
        }
    }

    /* Switch on the LED if an 1 was received as first character
    // if ((char)payload[0] == '1')
    // {
    //     digitalWrite(BUILTIN_LED, LOW); // Turn the LED on (Note that LOW is the voltage level
    //                                     // but actually the LED is on; this is because
    //                                     // it is active low on the ESP-01)
    // }
    // else
    // {
    //     digitalWrite(BUILTIN_LED, HIGH); // Turn the LED off by making the voltage HIGH
    // } */
}

void reconnect()
{
    // Loop until we're reconnected
    while (!client.connected())
    {

        Serial.println("Attempting EMQX MQTT connection...");
        // Create a random client ID
        mqtt_ClientID += String(random(0xffff), HEX);
        // Attempt to connect
        if (client.connect((mqtt_ClientID, mqtt_userName, mqtt_password)))
        {
            Serial.print(" connected with Client ID: ");
            Serial.println(mqtt_ClientID);
            // Once connected, publish an announcement...
            client.publish(pub_init_topic, "Hi, I'm online!");
            // ... and resubscribe
            client.subscribe(sub_topic);
        }
        else
        {
            Serial.print("failed, rc=");
            Serial.print(client.state());
            Serial.println(" try again in 5 seconds");
            // Wait 5 seconds before retrying
            delay(5000);
        }
    }
}

void setup()
{
    pinMode(LED, OUTPUT); // Initialize the _LED pin as an output
    digitalWrite(LED, LOW); //default ESP32 LOW is turn off

    Serial.begin(115200);
    setup_wifi();
    client.setServer(mqtt_server, 1883);
    client.setCallback(callback);
}

void loop()
{

    if (!client.connected())
    {
        reconnect();
    }
    client.loop();

    /* unsigned long now = millis();
    // if (now - lastMsg > 2000)
    // {
    //     lastMsg = now;
    //     ++value;
    //     snprintf(msg, MSG_BUFFER_SIZE, "hello world #%ld", value);
    //     Serial.print("Publish message: ");
    //     Serial.println(msg);
    //     client.publish("stonez56/esp32s_button_pushed", msg);
    // } */
}

2021/12/31

#10.1 如何開機自動連接Google 雲端硬碟/ How to auto-mount Google Drive on boot


如果時間不夠的朋友, 也可以從以下的時間軸挑選想看的部份即可!

#10.1 如何開機自動連接Google 雲端硬碟/ How to auto-mount Google Drive on boot


大家好, 今天是2021的最後一天, 祝大家新年快樂!!

在今年的最後天天, 來和大家分享 “一起來學樹莓派” 系列之 “如何開機自動連接Google 雲端硬碟/ How to auto-mount Google Drive on boot”

之前的影片做了一片”#10 重要資料, 直接備份到Google雲端硬碟的影片https://youtu.be/GmyiPJ1cxvk , 卻忘了一個重要的程序, 就是如何開機後, 如何自動連接Google 雲端硬碟, 少了這個重要的步驟, 那每次重新開機都要下 rclone 指令來掛載Google drive 也是很麻煩的!  請務必先看之前的影片 #10, 不然會不容易了解此片的內容!

 參考資料: 


home-pi-mnt-gdrive.mount (千萬別照抄...要依你 Rclone 設定來修改)

[Unit]
After=network.target

[Mount]
Type=rclone
What=gdrive:rpi4
Where=/home/pi/mnt/gdrive
Options=rw,allow_other,args2env,vfs-cache-mode=writes,config=/home/pi/.config/rclone/rclone.conf,cache-dir=/tmp

[Install]
WantedBy = multi-user.target


  •  gdrive:rpi4: Google drive 上要掛載的資料夾
  • /home/pi/mnt/gdrive: 對應的樹莓派上的資料夾
  • /home/pi/.config/rclone/rclone.conf: rclone 設定檔的位置!


如果時間不夠的朋友, 也可以從以下的時間軸挑選想看的部份即可!

影片時間軸: 00:00 開始 00:52 先閱讀 Rclone 文件 01:30 使用 ssh 程式來下達命令 02:18 遵守嚴格的磁碟掛載命名規則 03:17 解釋掛載檔案內容 07:36 不要忘記掛載文件要以 .mount 結尾 09:17 重新啟動以驗證自動掛載是否成功 10:19 沒有自動掛載的原因 12:19 重新啟動以再次檢查自動掛載 13:12 教學內容總結