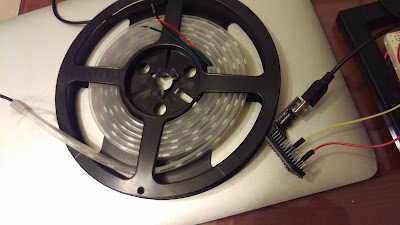
Material needed for this tutorial:
- W2812B LED Strip 60 LED per meter, 5V/3A (I bought 2 meters)
I bought water resistant which it has transparent covers on the whole strip. - Arduino Mini Pro * 1
- Few jump wires
- Power source for the LED Strip (Adapter or battery pack)
Here is the W2812B 5050 LED Strip I bought from an auction site. W2812B(3pins) is a newer generation and W2812(4 pins) is older generation. You may select the LED voltage (5V or 12V) of your preference as long as you have a suitable power source.
Three Wire Easy Connections:
- Arduino pin 6 to W2812B data pin
- Arduino +5V to power source 5V
- Arduino GND to power source GND
- W2812B +5V to +5V power 5V/3A adapter (Power needed depends on how many LED you hook up)
- W2812B GND to power 5V/3A adapter GND
- Arduino GND to W2812B GND
Writing the code is not an easy task! So, you need LED Library to quick light up WS1812B LED Strip. Get FastLED library from below link and install FastLED Library for your Arduino IDE.
FastLED Library: https://github.com/FastLED/FastLED
For more advanced control, you definitely want to visit FastLED Wiki to get more information.
For more advanced control, you definitely want to visit FastLED Wiki to get more information.
Load up the sample code from FastLED library "ColorTemperature".
You have to change the code to fit your Arduino environment settings:
1. LED_PIN = I use pin 6
2. NUM_LEDS = I have 120 in my LED Strip
Here is the source code:
1. LED_PIN = I use pin 6
2. NUM_LEDS = I have 120 in my LED Strip
Here is the source code:
#include <FastLED.h> #include#define LED_PIN 6 // Information about the LED strip itself #define NUM_LEDS 120 #define CHIPSET WS2811 #define COLOR_ORDER GRB CRGB leds[NUM_LEDS]; #define BRIGHTNESS 128 // FastLED v2.1 provides two color-management controls: // (1) color correction settings for each LED strip, and // (2) master control of the overall output 'color temperature' // // THIS EXAMPLE demonstrates the second, "color temperature" control. // It shows a simple rainbow animation first with one temperature profile, // and a few seconds later, with a different temperature profile. // // The first pixel of the strip will show the color temperature. // // HELPFUL HINTS for "seeing" the effect in this demo: // * Don't look directly at the LED pixels. Shine the LEDs aganst // a white wall, table, or piece of paper, and look at the reflected light. // // * If you watch it for a bit, and then walk away, and then come back // to it, you'll probably be able to "see" whether it's currently using // the 'redder' or the 'bluer' temperature profile, even not counting // the lowest 'indicator' pixel. // // // FastLED provides these pre-conigured incandescent color profiles: // Candle, Tungsten40W, Tungsten100W, Halogen, CarbonArc, // HighNoonSun, DirectSunlight, OvercastSky, ClearBlueSky, // FastLED provides these pre-configured gaseous-light color profiles: // WarmFluorescent, StandardFluorescent, CoolWhiteFluorescent, // FullSpectrumFluorescent, GrowLightFluorescent, BlackLightFluorescent, // MercuryVapor, SodiumVapor, MetalHalide, HighPressureSodium, // FastLED also provides an "Uncorrected temperature" profile // UncorrectedTemperature; #define TEMPERATURE_1 Tungsten100W #define TEMPERATURE_2 OvercastSky // How many seconds to show each temperature before switching #define DISPLAYTIME 20 // How many seconds to show black between switches #define BLACKTIME 3 void loop() { // draw a generic, no-name rainbow static uint8_t starthue = 0; fill_rainbow( leds + 5, NUM_LEDS - 5, --starthue, 20); // Choose which 'color temperature' profile to enable. uint8_t secs = (millis() / 1000) % (DISPLAYTIME * 2); if( secs < DISPLAYTIME) { FastLED.setTemperature( TEMPERATURE_1 ); // first temperature leds[0] = TEMPERATURE_1; // show indicator pixel } else { FastLED.setTemperature( TEMPERATURE_2 ); // second temperature leds[0] = TEMPERATURE_2; // show indicator pixel } // Black out the LEDs for a few secnds between color changes // to let the eyes and brains adjust if( (secs % DISPLAYTIME) < BLACKTIME) { memset8( leds, 0, NUM_LEDS * sizeof(CRGB)); } FastLED.show(); FastLED.delay(8); } void setup() { delay( 3000 ); // power-up safety delay // It's important to set the color correction for your LED strip here, // so that colors can be more accurately rendered through the 'temperature' profiles FastLED.addLeds<CHIPSET, LED_PIN, COLOR_ORDER>(leds, NUM_LEDS).setCorrection( TypicalSMD5050 ); FastLED.setBrightness( BRIGHTNESS ); }
Here is the W2812B in motion.
Although it is so easy to light it up, my final goal is to make a Lightsaber with this LED strip. With the MP3 module I tested before, I wish I can put these two together without any issue.
Let's see if would able to do that!
Done.
============================================================
測試 WS2812B LED 燈條
常在網路上看到許多人秀出彩色的LED燈條,不但能顯示出各種顏色還能做出千變萬化的效果! 經過一番網路搜尋,原來這燈條叫做 WS1812B 5050(我還是不知道5050的由來,知道的再告訴我)。於是我上網拍去買了2公尺燈條,現在動手來試試吧!做這個實驗所需的材料如下:
- W2812B LED 燈條 60 LED/公尺 , 5V/3A (我買了2公尺)
燈條有分防水和不防水的,你可以依自己的喜好做選擇。 - Arduino Mini Pro * 1
- 跳線數條
- 5V or 12V 電源/電池
WS2812B 5050 LED 燈條看起來如下。賣家賣的五公尺一捲,不過你可以買你要的長度。購買時要注意 W2812B只有3根腳位,如果是買到舊款的 W2812它有4根腳位,稍微注意一下。 燈條有兩種電壓 5V or 12V,我是選用 5V 的,不過你可以看看你手上的電源供應器或是電池來決定吧!
接法如下圖,只要一根資料線到 Pin 6 就好,記得要獨立提供給LED電源,因為它吃電還蠻兇的!
- Arduino pin 6 to W2812B data pin
- Arduino +5V to power source 5V
- Arduino GND to power source GND
- W2812B +5V to +5V power 5V/3A adapter (Power needed depends on how many LED you hook up)
- W2812B GND to power 5V/3A adapter GND
- Arduino GND to W2812B GND
首先,你要由此取得 FastLED Library: https://github.com/FastLED/FastLED
如果你想要寫程式來控制燈條的話,請到 FastLED Wiki 去參考這個 Library 的用法。
接著,把 "ColorTemperature" 這支程式由 FastLED library 裡打開來。程式碼請參考上方英文的部份。只要修改兩行:
1. LED_PIN = Arduino 的資料 Pin, 我選用 6
2. NUM_LEDS = LED 串聯的總顆數,我的是 120 顆
2. NUM_LEDS = LED 串聯的總顆數,我的是 120 顆
看看做完,LED燈光閃爍的樣子吧!
這個WS2812B使用上真的是太容易了! 不過我的最終目標是把這燈條拿來做一把光劍。 只要把這個燈條加上我之前做過實驗的 DFplayer Mini MP3 模組, 這個算盤打的很如意!哈哈,看看我是不是做到吧!
完。


