2022/05/22

ESP32-CAM module not stable, black screen, disconnect all the time? (模組 影像串流一直斷線不穩 - 先檢查電阻)

I have bought two ESP32-CAM modules and doing a weekend project. However, the video streaming from these two ESP-32CAM modules are not stable and just constantly disconnect and get black screens after few minutes or even few seconds. It's quite annoying.  After search and search, I found this article...

https://randomnerdtutorials.com/esp32-cam-connect-external-antenna/

If you have encountered similar issues on your ESP32-CAM modules, remember to check the location of the resistors.

Left: External antenna resistor location

Right: Internal antenna resistor location

Photo from the refereed website above. Thanks!


Thanks for the vendor who sold me these two ESP32-CAM modules that put on these external antenna resistors for me....but at least tell me in advance.   I was debug here and there for few days until I found out why! ha..  😅


===中文版====

我買了2 個ESP32-CAM 模組, 搞不定影像串流一直斷線不穩定….直到看到這一篇!  找了外接天線來裝上後, 穩定多了, 不再斷線黑畫面. 

如果你也遇到同樣的問題, 記得先檢查 ESP32-CAM 上的天線電阻位置. 

https://randomnerdtutorials.com/esp32-cam-connect-external-antenna/

左側圖: 外接天線電阻
右側圖: 內接天線電阻


但這老闆也太好心了, 給我的 2個模組都焊上了外接天線電阻...也沒有告訴我,  於是我一直 debug … debug … 再debug 就這樣花了好久時間~~ 😅


2022/05/09

App Inventor #2 “自己來寫mqtt APP Android & iOS都能用” (Create MQTT Apps with App Inventor 2)

本週我要進行教授的課程是 App Inventor 第二集。  “自己來寫mqtt APP Android & iOS都能用”.

這個影片適合初學者來觀看學習, 想拿來這個單元來學習 App Inventor 2 也是很 Ok 的! 

~~ 更新 2023-01-15~~~~~~~~~~~~~~~~~~~~~~~~~

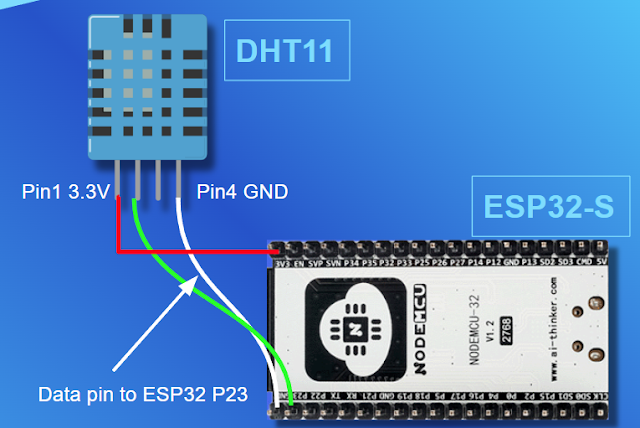
有少數朋友來詢問, 這個範例要怎麼連線, 所以我把 ESP32 + DH11 的連線方式寫在此分享:


~~~~~~~~~~~~~~~~~~~~~~~~~~~~~~~~~~~~~~~~~


上次為大家介紹了 Android MQTT App - MQTTDash, 但是苦於沒有免費好用的 iOS MQTT Client, 那就用 App Inventor 2 來自己寫吧~  據 App Inventor 2 官網資料, 它可以同步開發 Android & iOS App! 但是我沒有使用 iOS 手機, 有成功的朋友再來和大家回報一下, 謝謝! 


觀看本集後, 那要如何在 ESP32 上如何自己寫程式呢?

請看: Arduino #32 用一塊ESP32來學 IOT: 

https://www.youtube.com/watch?v=x3k_dZXua1I 


本影片用到的程式碼:

https://stonez56.blogspot.com/2022/04/android-34-esp32iot-android-learn-iot.html 


影片中有錯字更正, 不然收不到溫溼度喔~~

Typo here...

13:32 影片中口誤把 RWD (Responsive Web Design) 說成 RDW 

33:49 Correction: stonez56/esp32s_temp  

34:05 Correction: stonez56/esp32s_humd 

35:27 Correction: stonez56/esp32s_temp  

46:49 Correction: stonez56/esp32s_humd


App Inventor 程式碼提供在此, 以方便偵錯使用!


參考資料:

MIT App Inventor: https://appinventor.mit.edu/ 

MQTT extension: https://ullisroboterseite.de/android-AI2-PahoMQTT-en.html 

MQTT extension download: https://ullisroboterseite.de/android-AI2-PahoDown.html 

Apple store download: https://apps.apple.com/tw/app/mit-app-inventor/id1422709355 


如果時間不夠的朋友, 也可以從以下的時間軸挑選想看的部份即可!


影片時間軸:

00:00 Start

01:01 先到 MIT App Inventor 網站

01:50 導入 MQTT extension (外掛)

04:26 上傳App 所需要用的圖片

05:23 設置 Screen1

07:07 啟用可滾動樣式 - 可更容易排列元件

08:43 如何佈局螢幕

12:47 設置燈泡圖片

14:04 RWD設計, 元件皆以百分比來設定!

17:20 在標籤上顯示溫度/濕度

21:52 設置 MQTT 連接按鈕

24:56 將圖片設計成按鈕; 稍候方可點選!

25:26 設置 MQTT Extension (外掛)

27:31 點擊“Blocks”開始寫程式

30:10 MQTT連線狀態變更的設定

35:53 發布主題並打開/關閉燈泡

43:23 處理接收所訂閱的 topics

47:34 為 Android 生成 .apk 執行檔

49:30 如何在Apple 手機運行程式? (未實作! 慎入) 

App Inventor #3 “自己來寫APP 快篩何處買?” (How to process .csv files in App Inventor)

~~更新~~

有網友留言, 兩個Global變數 "search_city" & "search_area" 沒有在影片中定義~ 

剛剛把影片調出來看, 這兩個Global變數 "search_city" & "search_area" 的確沒有在影片中出現!  這兩周剪接這影片時, 可能被我不小心剪掉了, 請各位朋友自行加入這兩個變數. 謝謝darbertchang 提醒~ 

加入的方法可以參考這裡的作法喔: https://youtu.be/cEN9jAxf2VU

~~~~


App Inventor #3

大家好, 歡迎收看本週的Weekend project with Stonez56. 


 本週我要進行教授的課程是 App Inventor 第3集。  “App Inventor #3  “自己來寫APP 快篩何處買?” (How to process .csv files in App Inventor 2)”.  這個影片適合初學者來觀看學習, 想拿來這個單元來學習 App Inventor 2 也是很 Ok 的! 


這幾天最熱門的話題就是快篩試劑何處買了! 到處都大排長龍, 有找了許多點也找不到~ 本集的 App Inventor #3 我們一起來做一隻 App 以縣市, 鄉鎮區來查詢什麼地方才能買到.


這支App 主要是處理 .CSV 檔案來呈現 App 的資訊. 而這個資料是由政府資料開放平臺的- 配合辦理發放公費COVID-19家用快篩試劑社區定點診所名單 頁面下載的資料而來, 資料更新時間為 2022-04-26 20:16 算是很即時的資料~~ 不準不能怪我 Stonez56~~ (2022-5-6 17:09 又釋出新版資料, 格式不變, 一樣能用, 同學們記得下載新版來用)


我採用下載 .CSV 檔案後, 上傳到 App 裡, 再處理 .CSV. 我們也可以直接即時下載 .CSV 來得最新即時的資料, 但是我觀察了幾天, 資料變化不快, 不需要每執行一次, 就去下載一次 .CSV 快浪費時間, 也浪費頻寬~ 


一起動手來寫 APP 吧~ 


如果時間不夠的朋友, 也可以從以下的時間軸挑選想看的部份即可!


影片時間軸:

00:00:00 開始

00:00:28 了解這次開發程式的功能

00:01:38 從政府開放資料平台獲取資料(.CSV)

00:02:18 使用 OpenStreetMap, 拾棄 Google Map

00:02:51 了解 .CSV 文件格式

00:04:25 設計 App 使用者界面

00:16:59 準備開始來寫 APP

00:36:34 介紹AI2 Companion App

00:40:39 如何建立並使用副程式(Procedure)

00:56:42 使用 ListUtils 擴展刪除重複項

01:09:29 如何分割/結合字串

01:25:40 使用副程式(Procedure)的好處

01:27:11 加入 OpenStreetMap 地圖畫面

01:28:09 設計 MapScreen 使用者介面

01:33:59 開始設計 MapScreen 程式

01:47:06 秘密挑戰~~ ;)

圖檔下載:


rapid-test-icon.png


rapid-test-big.png

AI2 程式碼 (Screen 1):

變數定義 (Define Global variables)

產生查詢結果到 list view (Generate display item list)

Screen1 Initialize & process after read .csv file

After picking of city & area / populate specific city & unique area


AI2 程式碼 (MapScreen):

顯示結果在 OpenStreetMap 上 (Show results on the map)


參考資料:

* 如何處理 .csv: https://www.youtube.com/watch?v=K2n98PYO90M 

* TextUtils extension: https://community.appinventor.mit.edu/t/all-rescued-extensions-from-appybuilder-community/27169/47?page=3 

 * 配合辦理發放公費COVID-19家用快篩試劑社區定點診所名稱、地址、座標

https://data.gov.tw/dataset/150692 

* Google Map 取得 Marker 要輸入信用卡資料了: 

https://developers.google.com/maps/documentation/maps-static/overview 

* APP 地圖使用: App Inventor 內建之 OpenStreet Map: https://www.openstreetmap.org/#map=8/23.611/120.768