Weekend Project – Arduino Temperature Meter
Found an interesting temperature probe on the auction site and I decided to acquire two pieces to test them out. With the LCD module, it seems making a temperature meter is not that hard at all.
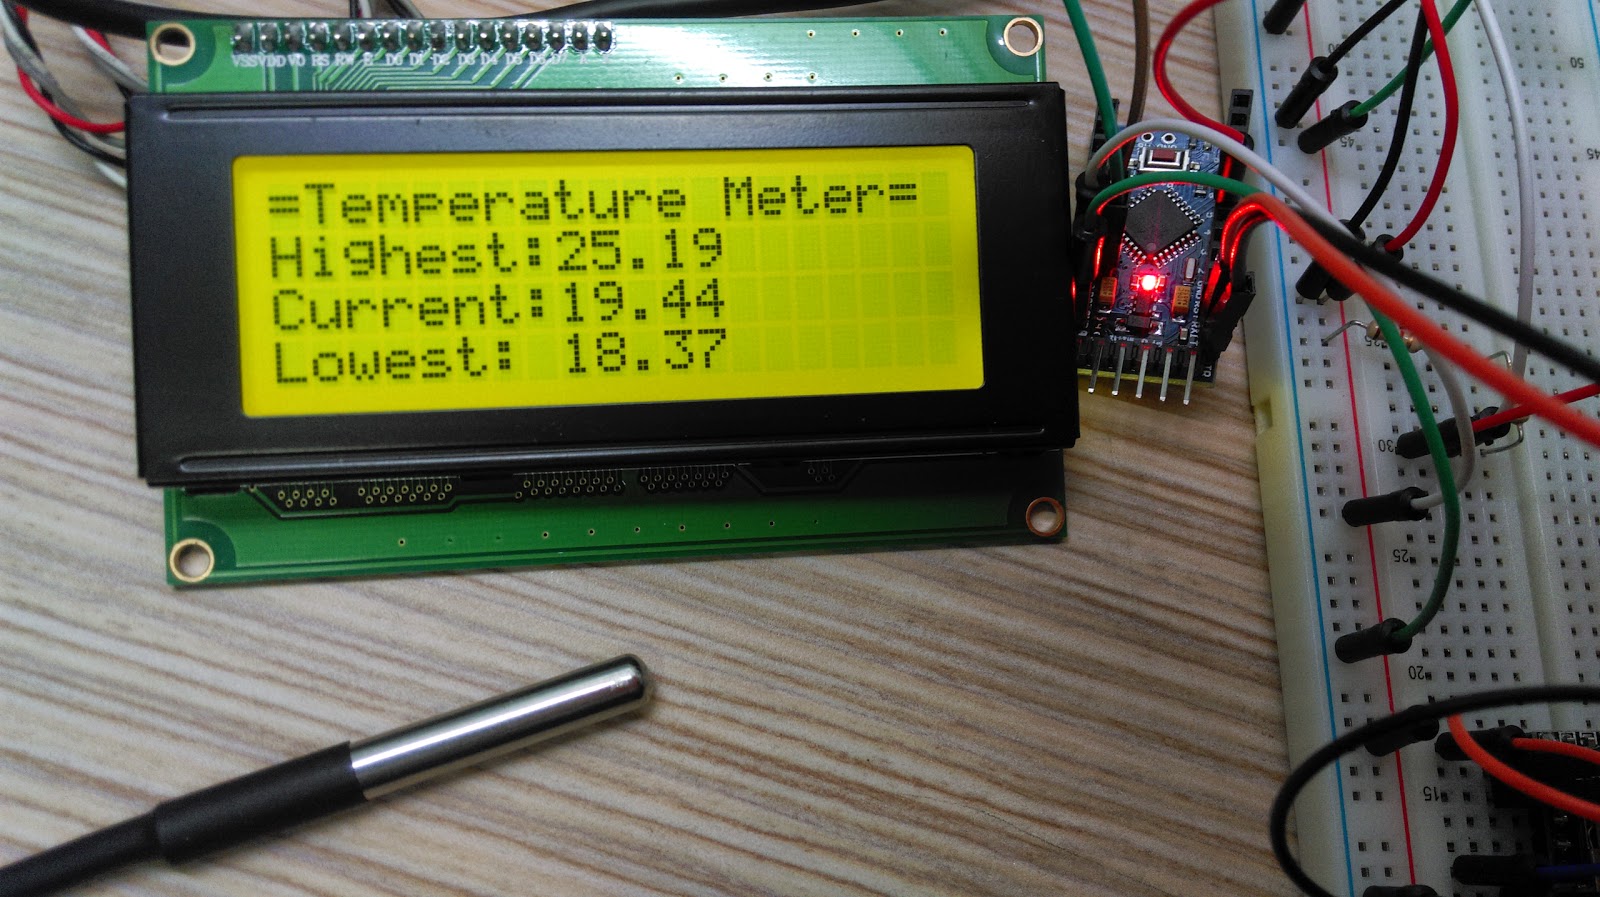
In this tutorial, I will show you how to make a temperature meter that allows you to measure temperature with a probe and display current, highest, and lowest temperatures on LCD module.
After I made this, I left it on the desk almost a week and it’s still working!
I guess it’s time to share how I did this.
See photo below:
- Arudino Mini Pro * 1
- LCD Module 4 x 20 (J204A) * 1
- Temperature Probe (DS18B20) * 1
- Protoboard * 1
- 22k resistor * 1
- Few jumper wires
- Arduino-GND to GND
- Arduino-VCC to VCC
- Temperature probe-GND to GND
- Temperature probe-VCC to VCC
- Temperature probe-Data to 2.2K resistor to VCC
- LCD-GND to GND
- LCD-VCC to VCC
- LCD-SDA to Arduino A4/SDA
- LCD-SLC to Arduino A5/SLC
- Protoboard VCC/GND to 5V DC power source
- Slide switch to VCC/GND (For LCD on/Off, but not shown below)
Connection:
LCD Module:
//Library version:1.1
#include <Wire.h>
#include <LiquidCrystal_I2C.h>
//Used for DS18S20 Temperature sensor
#include <OneWire.h>
#include <DallasTemperature.h>

/*Define for DS18S20 data pins
*  This data pins needs to connect 220 Om resister and to 5V to work
*/
#define ONE_WIRE_BUS 4

//Define for LCD display pins, SLC 3, SDA 2
#define SCL_CLOCK_PIN 3
#define SDA_DATA_PIN 2

//Initialize OneWire library for temperature sensor
OneWire oneWire(ONE_WIRE_BUS);
DallasTemperature sensors(&oneWire);

// set the LCD address to 0x27 for a 20 chars and 4 line display
LiquidCrystal_I2C lcd(0x27,20,4);

float HighestTemp = 0.0;
float CurrentTemp = 0.0;
float LowestTemp = 0.0;

void setup()
{
  // start temperature sensor
  sensors.begin();
  sensors.requestTemperatures(); //get temperature
  // initialize the LCD
  //You may setup your own clock pin(SCL), data pin(SDA) 2013-12-14
  //Wire.beginOnPins(SCL_CLOCK_PIN, SDA_DATA_PIN);
  lcd.init();

  lcd.backlight();

  //Set lowest, highest temperatues
  CurrentTemp  = sensors.getTempCByIndex(0);
  HighestTemp = CurrentTemp;
  LowestTemp = CurrentTemp;

  lcd.setCursor(0,0);
  lcd.print(F("=Temperature Meter="));

  lcd.setCursor(0,1);
  lcd.print(F("Highest: "));
  LCDshowNum(8,1,HighestTemp);

  lcd.setCursor(0,2);
  lcd.print(F("Current: "));
  LCDshowNum(8,2,CurrentTemp);

  lcd.setCursor(0,3);
  lcd.print(F("Lowest: "));
  LCDshowNum(8,3,LowestTemp);
}


void loop()
{
  sensors.requestTemperatures(); //get temperature

  //Get Current
  CurrentTemp = sensors.getTempCByIndex(0);
  LCDshowNum(8,2,CurrentTemp);

  //Check if Hightest
  if(CurrentTemp > HighestTemp){
     HighestTemp = CurrentTemp;
     LCDshowNum(8,1,HighestTemp);
  }

  //Chekc if Lowest
  if(CurrentTemp < LowestTemp){
    LowestTemp = CurrentTemp;
    LCDshowNum(8,3,LowestTemp);
  }

  delay(1);
}

/*
* LCDshowNum
* LCD display location: x, y
* Float n: temperature to display
*/
void LCDshowNum(int x, int y, float n){
  lcd.setCursor(x,y);
  lcd.print(n);
}
In the video, I had three bottles filled with hot water from drinking fountain, room temperature tap water, and ice cube water. I told my son to place the probe into each bottle and we observed the changing in temperatures. It was a lot of fun to see the temperature goes high and low!
My son asked me “Is there a way to see temperature drop to 0 or minus”? We quickly found the answer from Internet. The answer is so simple, just put salt on top of ice cubes without water. With in a minute, the temperature dropped to -11 Celsius degrees (12 degrees in Fahrenheit). Actually, the lowest temperature we got was Celsius -14.31 (6.242 degrees in Fahrenheit), but not recorded in the video. See video below.
I hope you enjoy this tutorial and have fun with your kids!
I hope you enjoy this tutorial and have fun with your kids!
Stonez
自製 Arduino 溫度測量機
在這個教學中,我會教你們怎麼做一個可以讓你在LCD模型上測量出目前的溫度,最高的溫度和最低的溫度的「溫度測量機」。在我完成它之後,我把它放在桌子上大約一個星期後,它還在運作呢!☺ 我覺得是時候該跟大家分享我是怎麼製作它了。看看我的溫度測量機:

需要材料:
- Arudino Mini Pro * 1
- LCD 模組 4 x 20 (J204A) * 1
- 溫度探棒 (DS18B20) * 1
- 洞洞板 * 1
- 22k 電阻 * 1
- 幾根跳線
線路連接方法:
- Arduino-GND to GND
- Arduino-VCC to VCC
- Temperature probe-GND to GND
- Temperature probe-VCC to VCC
- Temperature probe-Data to 2.2K resistor to VCC
- LCD-GND to GND
- LCD-VCC to VCC
- LCD-SDA to Arduino A4/SDA
- LCD-SLC to Arduino A5/SLC
- Protoboard VCC/GND to 5V DC power source
- Slide switch to VCC/GND (For LCD on/Off, but not shown below)
電路圖如下:
我兒子問我:「有沒有可能讓溫度降到零度或更低?」我們很快的從網路上找到了答案。其實很簡單,只要在冰塊上撒鹽。過了大約一分鐘,溫度就降到了-11度 C(我們最低該溫度降到到-14.31度 C)!看著溫度快速的上升又急快的下降真有趣!請看底下的影片:
找個時間做這個Arduino 專案,再和小朋友一起同樂吧!
Stonez


You should store min. and max. temperature in the EEPROM, because after power supply break you loose the history.
ReplyDeleteThat's a good idea! I think Ialso need a clock to record date time stamp as well.
DeleteSir i am The Admin of this Website WWW.Electronicslovers.com ......Just look carefully we shared the Author name and The link address of your Blog at the End of the article
DeleteSir i am The Admin of this Website WWW.Electronicslovers.com ......Just look carefully we shared the Author name and The link address of your Blog at the End of the article
DeleteElectronicsLovers, I am very welcome people to re-share this idea, but ask for a respect. Checked your web site, there is no original link to this blog and you shouldn't place a logo watermark on the image I made. I looks like your own creation!
DeletePlease do folloing things:
1. Keep the original URL link to this page
2. Remove watermark logo from the image I made.
Stonez
ElectronicsLovers, I am very welcome people to re-share this idea, but ask for a respect. Checked your web site, there is no original link to this blog and you shouldn't place a logo watermark on the image I made. I looks like your own creation!
DeletePlease do folloing things:
1. Keep the original URL link to this page
2. Remove watermark logo from the image I made.
Stonez
Thank you. Very nice tutorial.
ReplyDeletethis is my next project
Alvaro Pandolpho, thank you and have fun!
Delete不错,请问新手应该从哪个方面入手。
ReplyDelete先到Arduino.cc 網站上看看資料,接著用Google搜尋你想做的題材,大部份都找的到。也可以上Makes, Instructable 網站找找資料。
Delete谢谢你,我是写script的。看到有一个项目可以用js来写arduino,可是硬件知识比较少。
ReplyDelete我也是寫軟件的,買些電子材料回來,再上網試做看看。Arduino 還蠻容易上手的。
DeleteHi there = sorry if this comment appears twice - I have been searching for this exact solution! Thanks! I am an electronics newbie and have a question regarding power - I need to make one of these for a science investigation and I need it to work for 24 hours on battery power only - is it possible to use 4 x AA batteries with this design? If not, what would be the simplest way of powering it for 24 hours in the field? Many thanks!
ReplyDeleteUh...I am an electronic new comer as well. I haven't calculate how much power does the whole unit consumer per hour, but I think you can turn off the LCD backlight and update temperature less frequently to consume less power.
DeleteAlso, consider to use rechargeable Alkaline batteries which these batteries have larger capacity up to 3000mAh. Put 4 of these together, you would get 12,000mAh... This should get you through 24hr for sure!
How does it measure the temperature? dont you need to convert it from volts to degrees in the code?
ReplyDeleteHi Jeff, it's all in the DallasTemperature.h library! Just include the library and use the command below to get current temperature.
Deletesensors.requestTemperatures(); //get temperature
Hey in the video it looks like you have extra components hooked up. what do those do?
ReplyDeleteNo, all the components needed are in the schematic.
DeleteWhat you saw on the breadboard are for other projects.
Good luck!
Thanks a lot! I appreciate your help
Delete